2023. 11. 2. 19:14ㆍ학부 강의/웹프로그래밍 (Spring)
0. 출처
아직 배우고 있는 중이라 부정확한 정보가 포함되어 있을 수 있습니다!
주의하세요!
올인원 스프링 프레임워크 참고.
올인원 스프링 프레임워크 : 네이버 도서
네이버 도서 상세정보를 제공합니다.
search.shopping.naver.com
1. 클라이언트의 요청이 처리되는 과정
서버는 어떤 과정을 거쳐서 클라이언트의 요청에 응답하는가?

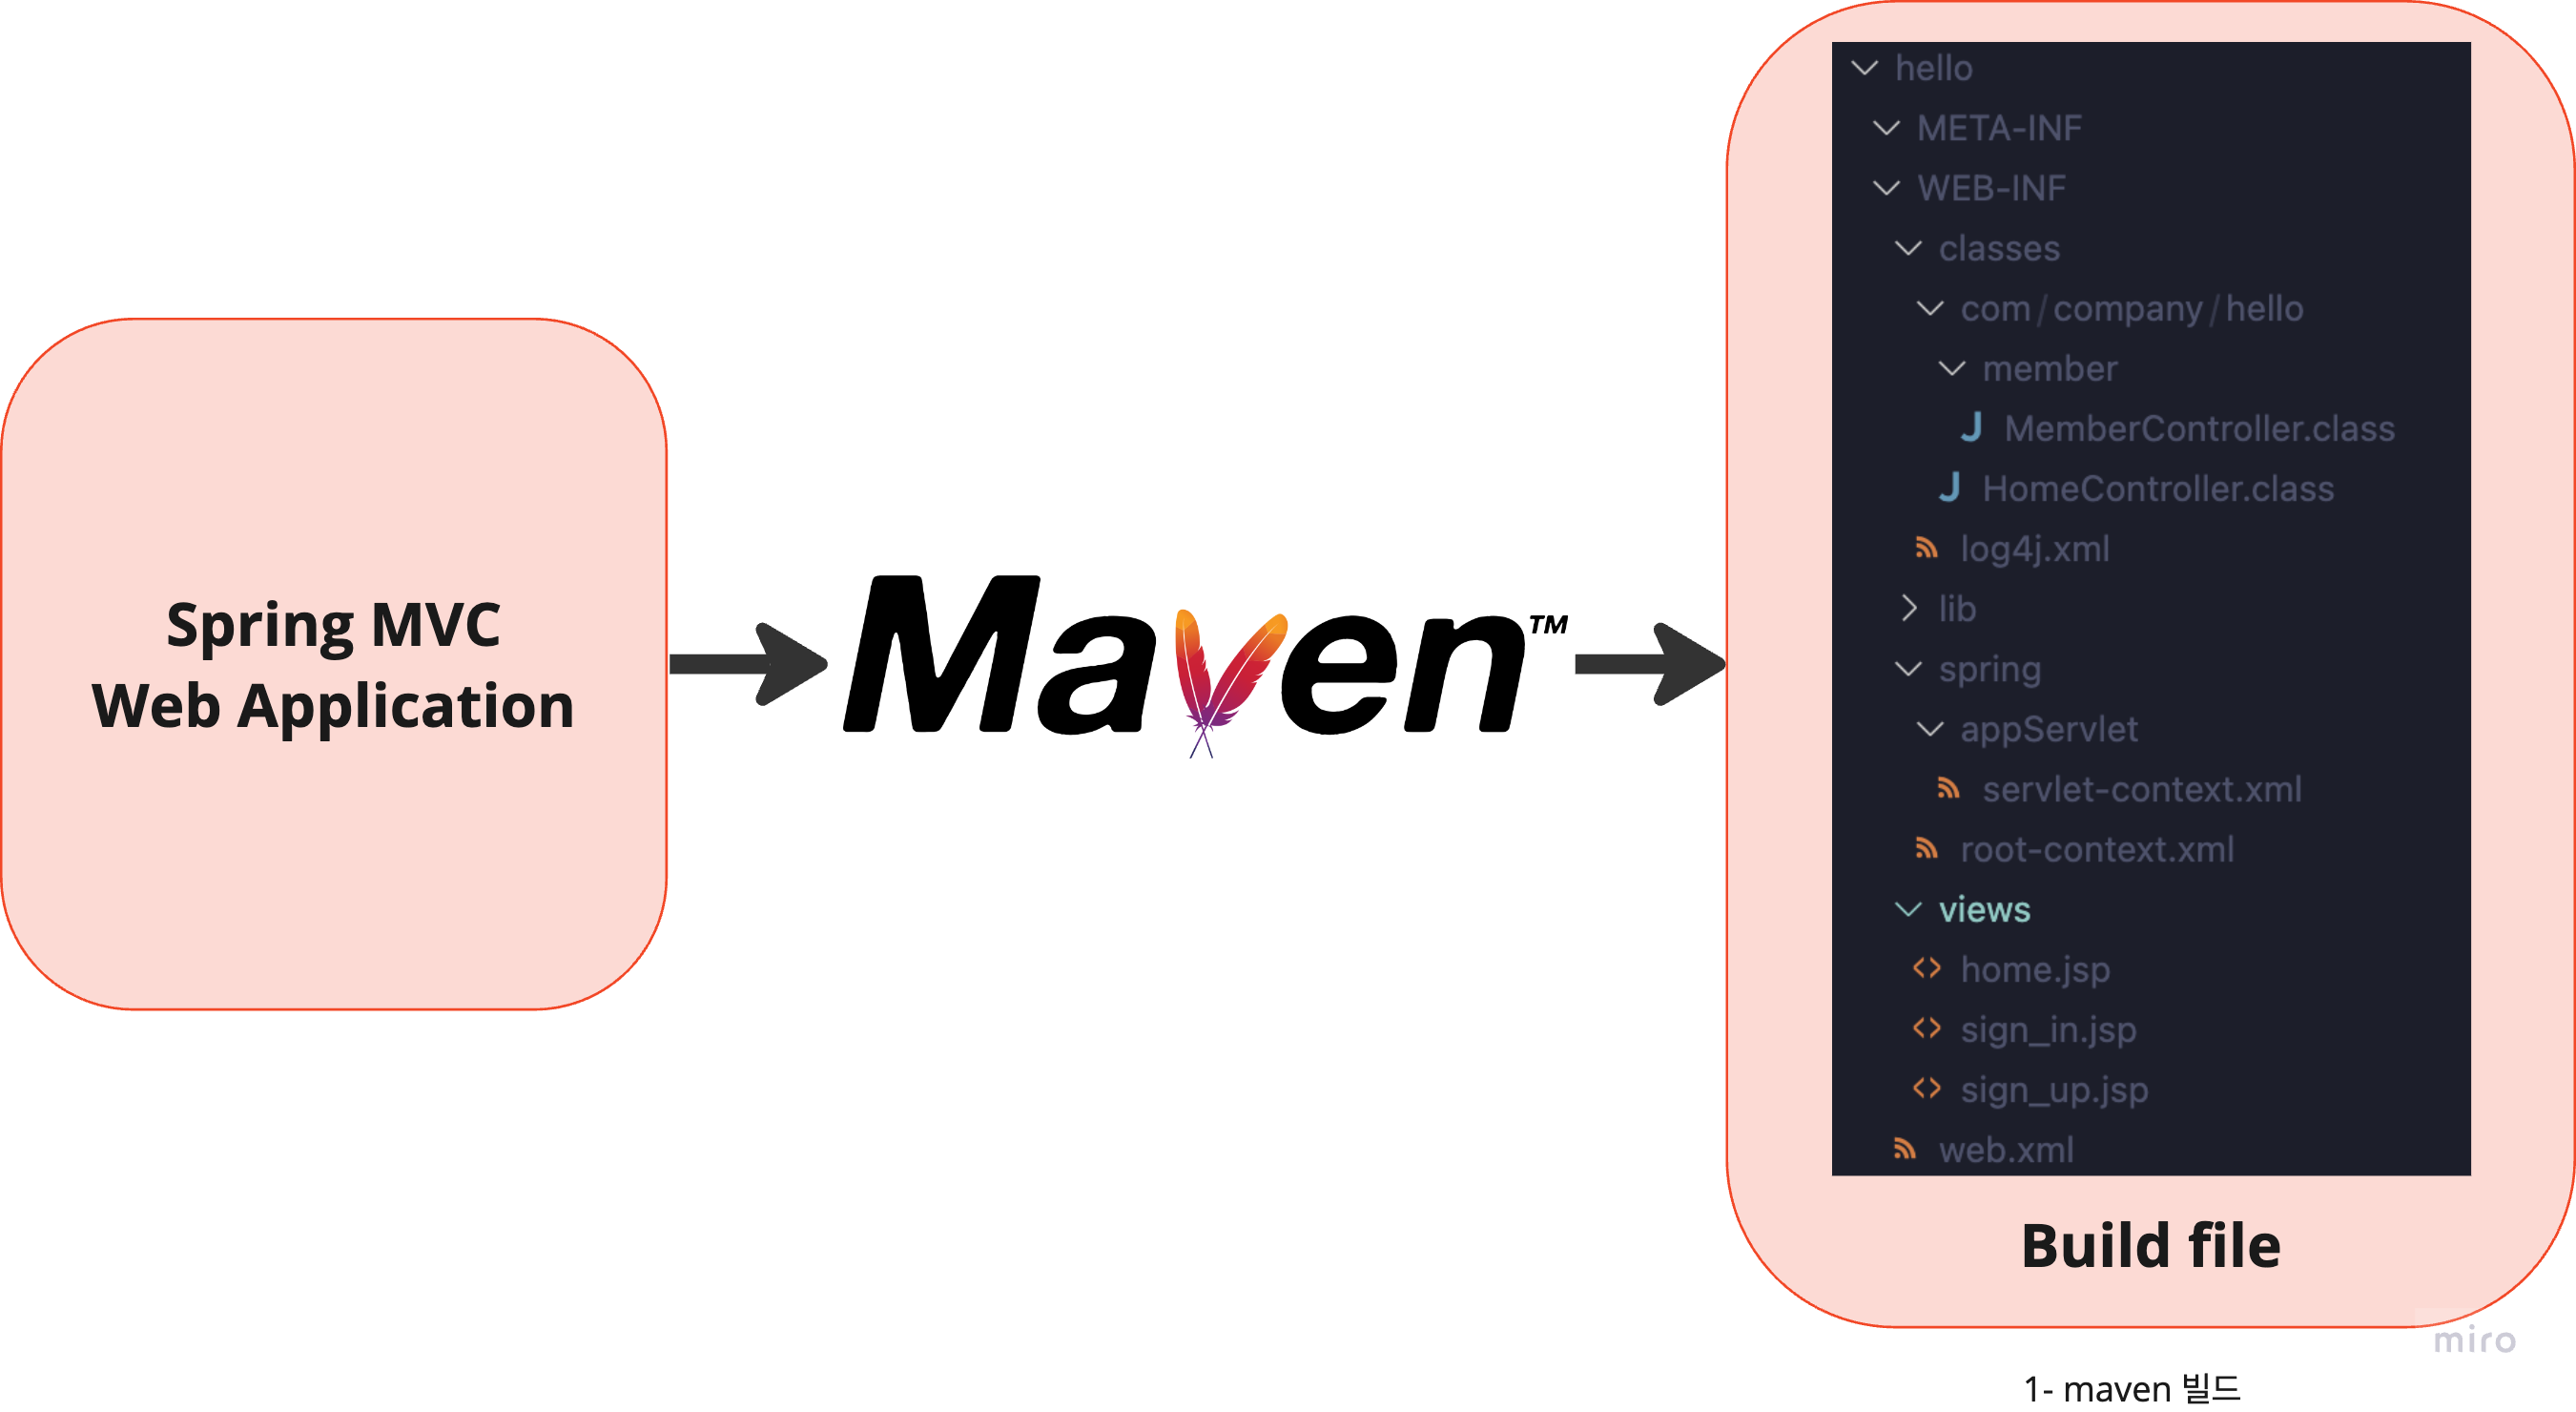
1) Maven이 Spring mvc 프로젝트를 빌드하고, 빌드 파일을 Tomcat에 추가한다.
2) Tomcat 서버가 실행되면 서버는 server.xml을 읽는다. 서버를 context에 따라서 실행한다.
3) server.xml에서 서비스할 앱을 찾는다.
4) 앱의 web.xml을 읽고 앱을 초기화한다. 이때 DispatcherServlet이 생성된다.
5) servlet-context.xml에서 @Controller를 사용해서 controller를 생성할 것을 확인한다.
6) 클라이언트의 요청이 들어온다.
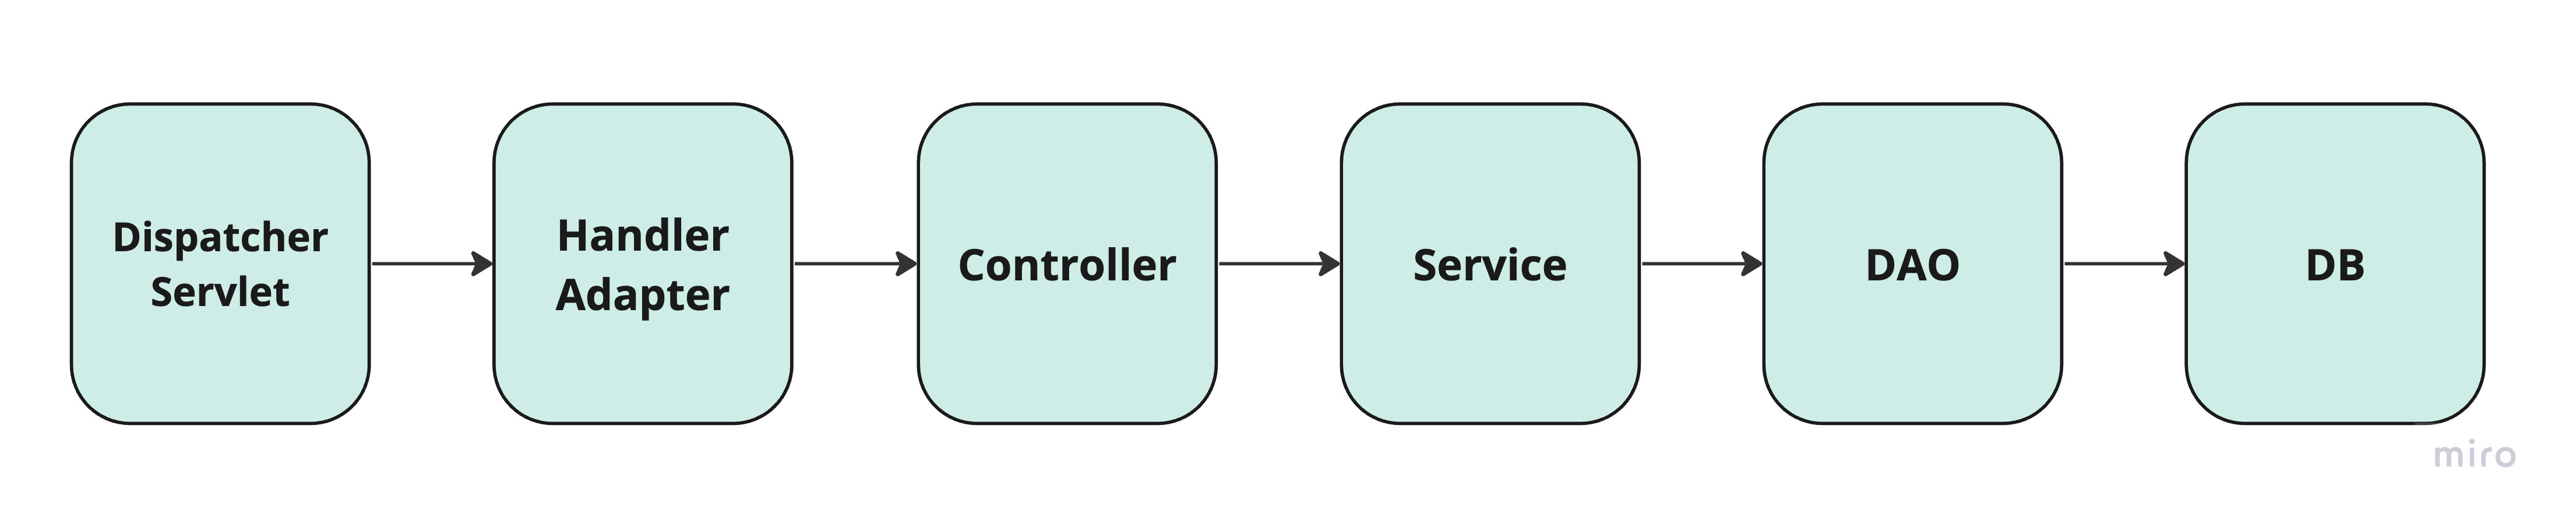
7) DispatcherServlet가 HandlerMapping에게 클라이언트 요청에 적합한 컨트롤러를 찾도록 요청한다.
8) HandlerMapping에서 적합한 컨트롤러를 찾아서 반환한다.(@Controller 맵핑하는 방법 참고)
9 ~ 10) DispatcherServlet는 HandlerAdapter에게 컨트롤러를 전달하고 실행을 위임한다.
11 ~ 12) 컨트롤러에서 모델(서비스)을, 모델(서비스)에서 Dao를 호출한다.
13 ~ 15) 컨트롤러는 모델(서비스)의 실행 결과인 ModelAndView를 HandlerAdapter에게 반환한다
16) HandlerAdapter는 다시 ModelAndView를 DispatcherServlet 객체에 전달한다.
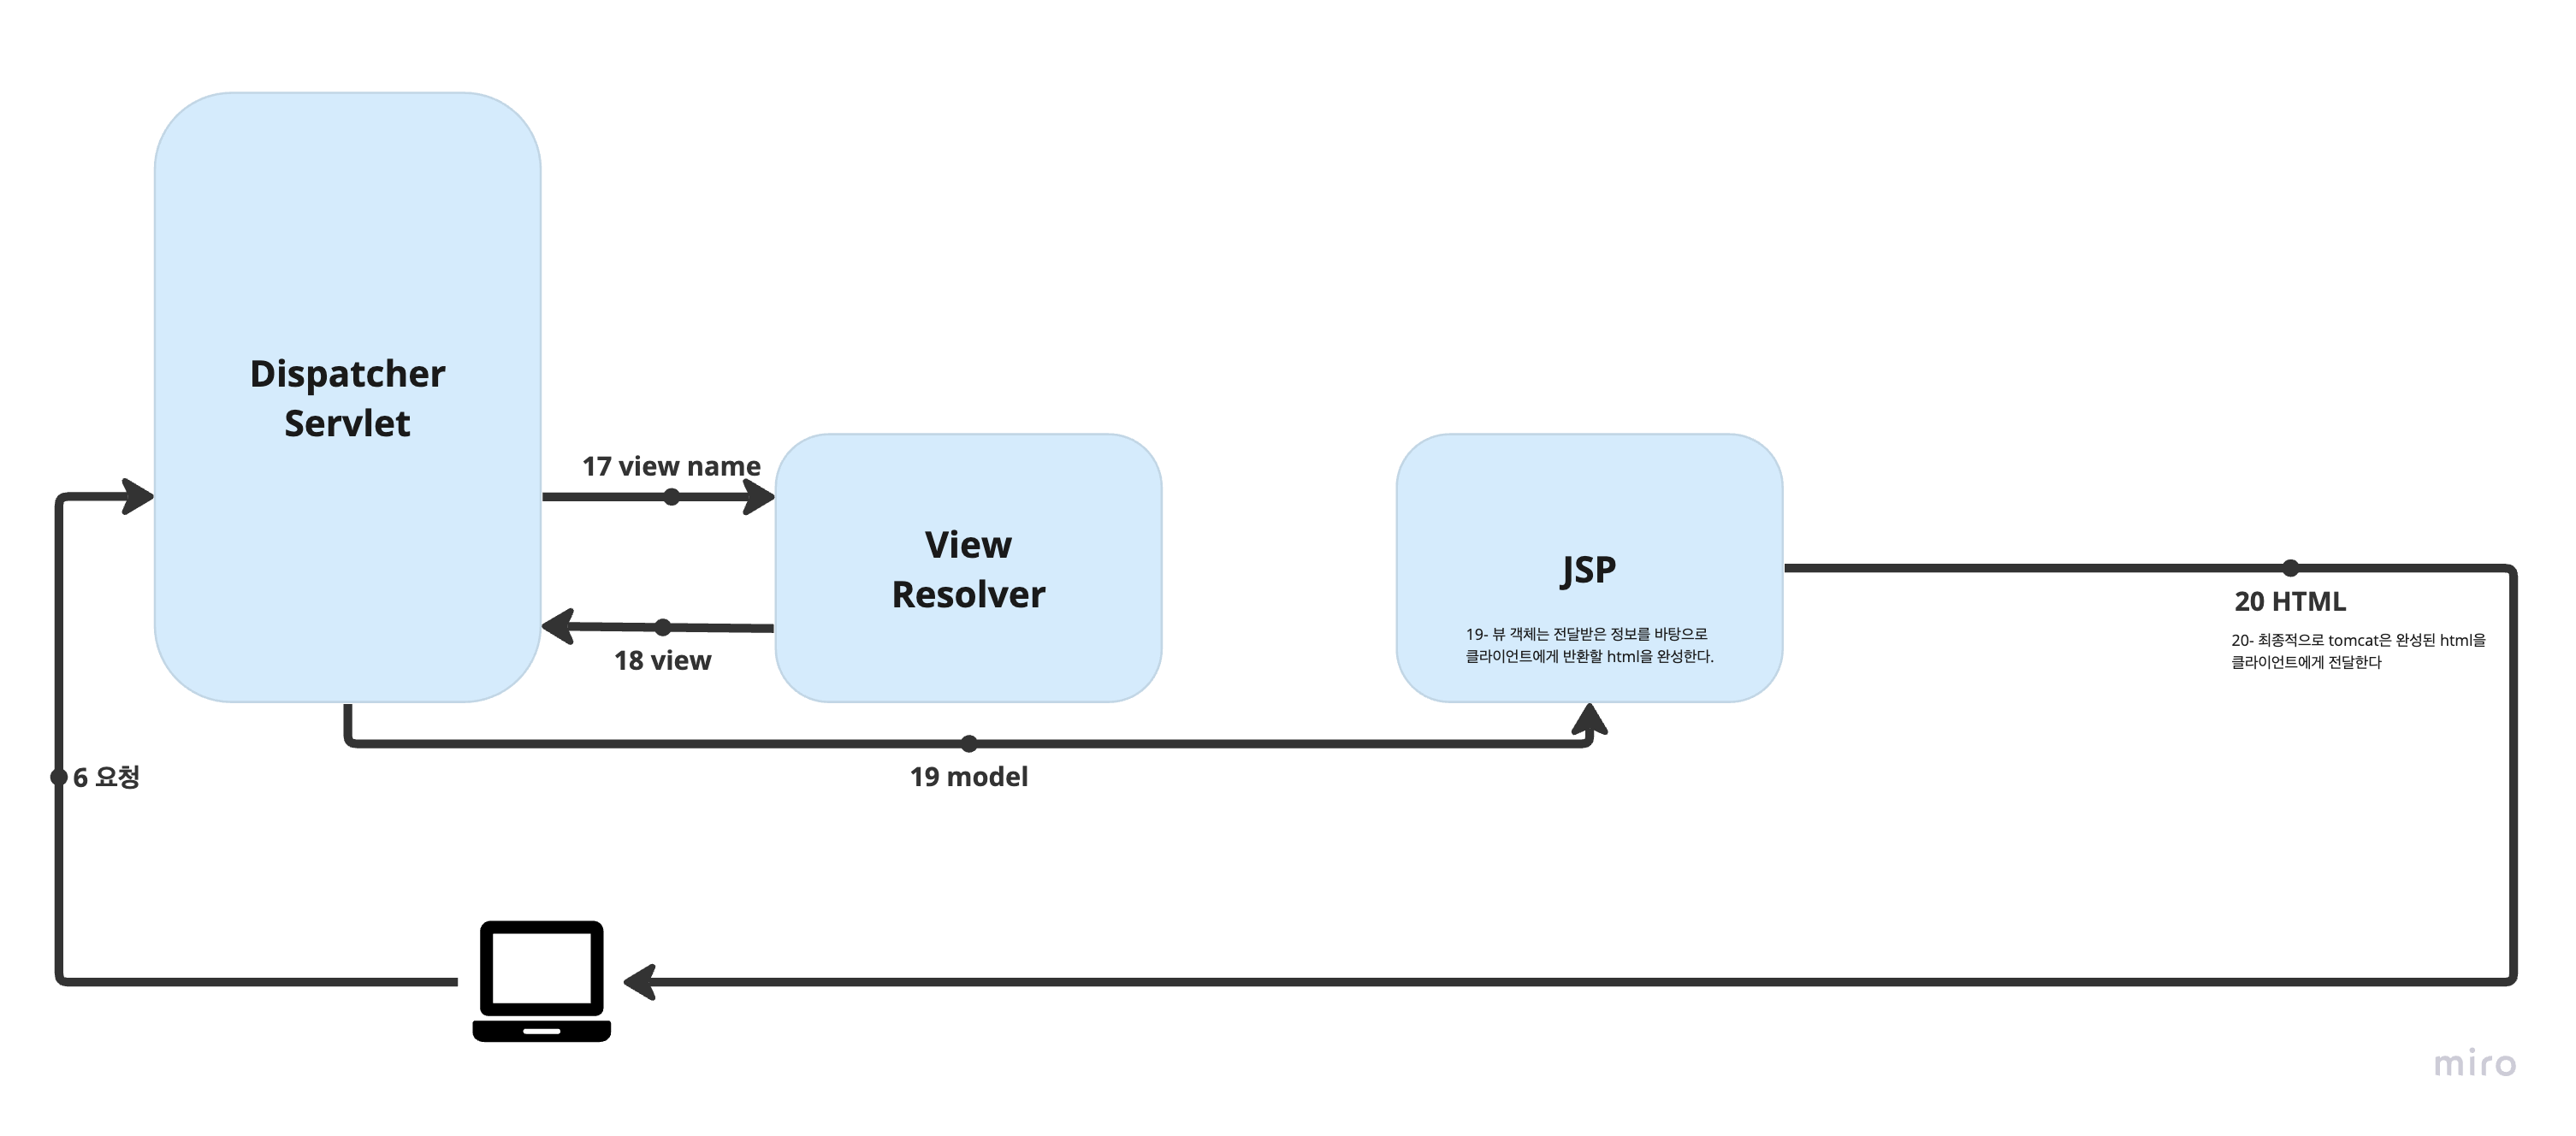
17) DispatcherServlet는 ViewResolver를 이용해서 처리 결과에 적합한 뷰를 찾는다.
18) ViewResolver는 ModelAndView의 뷰 정보를 이용해서 적합한 뷰를 찾아서 DispatcherServlet로 반환한다.
19) DispatcherServlet는 뷰 객체를 준비하고 뷰 객체에게 모델의 처리 결과를 전달한다. Tomcat은 JSP를 실행해서 클라이언트에게 반환할 HTML을 완성한다.
20) 최종적으로 Tomcat은 완성된 HTML을 클라이언트에게 전달한다.
출처 : https://bigfat.tistory.com/66
2. pom.xml
STS가 자동으로 생성 및 초기화한다.
개발자는 여기에 필요한 내용을 추가하고 불필요한 내용을 삭제하면 된다.
이번에 새로 추가된 부분만 살펴보자.
- 스프링 MVC 프레임워크 추가
<dependency>
    <groupId>org.springframework</groupId>
    <artifactId>spring-webmvc</artifactId>
    <version>${org.springframework-version}</version>
</dependency>
- 웹 프로젝트에 필요한 서블릿 관련 라이브러리를 추가
<!-- Servlet -->
<dependency>
    <groupId>javax.servlet</groupId>
    <artifactId>servlet-api</artifactId>
    <version>2.5</version>
    <scope>provided</scope>
</dependency>
<dependency>
    <groupId>javax.servlet.jsp</groupId>
    <artifactId>jsp-api</artifactId>
    <version>2.1</version>
    <scope>provided</scope>
</dependency>
<dependency>
    <groupId>javax.servlet</groupId>
    <artifactId>jstl</artifactId>
    <version>1.2</version>
</dependency>
그 외 AspectJ, slf4j와 log4j 등도 추가되었다.
3. web.xml

Tomcat은 시작될 때 server.xml을 읽는다.
<!-- server.xml -->
<Connector port="8090" protocol="HTTP/1.1" connectionTimeout="20000" redirectPort="8443" maxParameterCount="1000" />
...
<Host name="localhost"  appBase="webapps" unpackWARs="true" autoDeploy="true">
...
server.xml에는 Tomcat의 주요 설정 정보가 들어 있으며, 그중 하나가 Host와 관련된 설정이다.
각 웹 애플리케이션의 WEB-INF 디렉터리 내에는 web.xml이 있다.
web.xml은 웹 애플리케이션의 배포 서술자(Deployment Descriptor)로 애플리케이션에 대한 중요한 설정 정보를 담고 있다. (서블릿 정의, 서블릿 맵핑, 필터, 리스너, 초기 파라미터, 오류 페이지 등)
Tomcat은 web.xml을 읽어서 웹 애플리케이션의 구성 및 동작 방식을 파악한다.
웹 애플리케이션을 로드할 때 Tomcat이 애플리케이션의 web.xml을 읽는 것은 약.속.된 사항이다.
Tomcat 뿐만 아니라 Servlet/JSP 기반의 웹 애플리케이션을 실행하는 서블릿 컨테이너(Tomcat, Jetty, WildFly 등)는 web.xml을 읽어 웹 애플리케이션의 구성 정보를 파악한다.
<?xml version="1.0" encoding="UTF-8"?>
<web-app version="2.5" xmlns="http://java.sun.com/xml/ns/javaee"
    xmlns:xsi="http://www.w3.org/2001/XMLSchema-instance"
    xsi:schemaLocation="http://java.sun.com/xml/ns/javaee https://java.sun.com/xml/ns/javaee/web-app_2_5.xsd">

    <!-- The definition of the Root Spring Container shared by all Servlets and Filters -->
    <context-param>
        <param-name>contextConfigLocation</param-name>
        <param-value>/WEB-INF/spring/root-context.xml</param-value>
    </context-param>

    <!-- Creates the Spring Container shared by all Servlets and Filters -->
    <listener>
        <listener-class>org.springframework.web.context.ContextLoaderListener</listener-class>
    </listener>

    <!-- Processes application requests -->
    <servlet>
        <servlet-name>appServlet</servlet-name>
        <servlet-class>org.springframework.web.servlet.DispatcherServlet</servlet-class>
        <init-param>
            <param-name>contextConfigLocation</param-name>
            <param-value>/WEB-INF/spring/appServlet/servlet-context.xml</param-value>
        </init-param>
        <load-on-startup>1</load-on-startup>
    </servlet>

    <servlet-mapping>
        <servlet-name>appServlet</servlet-name>
        <url-pattern>/</url-pattern>
    </servlet-mapping>

    <!-- 추가 -->
    <filter>
        <filter-name>encodingFilter</filter-name>
        <filter-class>org.springframework.web.filter.CharacterEncodingFilter</filter-class>
        <init-param>
            <param-name>encoding</param-name>
            <param-value>UTF-8</param-value>
        </init-param>
        <init-param>
            <param-name>forceEncoding</param-name>
            <param-value>true</param-value>
        </init-param>
    </filter>
    <filter-mapping>
        <filter-name>encodingFilter</filter-name>
        <url-pattern>/*</url-pattern>
    </filter-mapping>
</web-app>
한 줄씩 살펴보자.
<!-- The definition of the Root Spring Container shared by all Servlets and Filters -->
<context-param>
    <param-name>contextConfigLocation</param-name>
    <param-value>/WEB-INF/spring/root-context.xml</param-value>
</context-param>
웹 애플리케이션 전체에 걸쳐 사용되는 콘텍스트 파라미터를 정의
<!-- Creates the Spring Container shared by all Servlets and Filters -->
<listener>
    <listener-class>org.springframework.web.context.ContextLoaderListener</listener-class>
</listener>
웹 애플리케이션의 이벤트 리스너를 정의, 스프링 콘텍스트의 로딩을 담당합니다.
<!-- Processes application requests -->
<servlet>
    <servlet-name>appServlet</servlet-name>
    <servlet-class>org.springframework.web.servlet.DispatcherServlet</servlet-class>
    <init-param>
        <param-name>contextConfigLocation</param-name>
        <param-value>/WEB-INF/spring/appServlet/servlet-context.xml</param-value>
    </init-param>
    <load-on-startup>1</load-on-startup>
</servlet>
DispatcherServlet 클래스를 appServlet이라는 이름으로 서블릿에 등록한다.
contextConfigLocation이라는 이름으로 스프링 설정 파일 servlet-context.xml을 등록한다.
<load-on-startup>1</load-on-startup> : 웹 애플리케이션의 시작 시점에 해당 서블릿을 로딩하고 초기화할지의 여부와 그 우선 순서를 설정. 태그가 생략될 경우에 해당 서블릿은 첫 번째 요청이 있을 때까지 초기화되지 않음.
<servlet-mapping>
    <servlet-name>appServlet</servlet-name>
    <url-pattern>/</url-pattern>
</servlet-mapping>
위에서 정의한 서블릿(appServlet)이 담당할 url 패턴을 정의한다.
모든 요청을 처리하도록 /로 설정한다.
<filter> 부분은 저번 시간에 추가한 한글 인코딩 관련 설정이다.
출처 : ChatGPT4.0
4. servlet-context.xml

<?xml version="1.0" encoding="UTF-8"?>
<beans:beans xmlns="http://www.springframework.org/schema/mvc"
    xmlns:xsi="http://www.w3.org/2001/XMLSchema-instance"
    xmlns:beans="http://www.springframework.org/schema/beans"
    xmlns:context="http://www.springframework.org/schema/context"
    xsi:schemaLocation="http://www.springframework.org/schema/mvc https://www.springframework.org/schema/mvc/spring-mvc.xsd
        http://www.springframework.org/schema/beans https://www.springframework.org/schema/beans/spring-beans.xsd
        http://www.springframework.org/schema/context https://www.springframework.org/schema/context/spring-context.xsd">

    <!-- DispatcherServlet Context: defines this servlet's request-processing infrastructure -->

    <!-- Enables the Spring MVC @Controller programming model -->
    <annotation-driven />

    <!-- Handles HTTP GET requests for /resources/** by efficiently serving up static resources in the ${webappRoot}/resources directory -->
    <resources mapping="/resources/**" location="/resources/" />

    <!-- Resolves views selected for rendering by @Controllers to .jsp resources in the /WEB-INF/views directory -->
    <beans:bean class="org.springframework.web.servlet.view.InternalResourceViewResolver">
        <beans:property name="prefix" value="/WEB-INF/views/" />
        <beans:property name="suffix" value=".jsp" />
    </beans:bean>

    <context:component-scan base-package="com.company.hello" />
</beans:beans>
전체 servlet-context.xml이다.
하나씩 살펴보면 …
<!-- Enables the Spring MVC @Controller programming model -->
<annotation-driven />
@Controller 애너테이션이 사용된 클래스를 컨트롤러로 사용할 것을 명시한다.
<!-- Handles HTTP GET requests for /resources/** by efficiently serving up static resources in the ${webappRoot}/resources directory -->
<resources mapping="/resources/**" location="/resources/" />
정적인 자원에 대한 요청 /resources/**을 처리한다.
정적인 자원은 ${webappRoot}/resources/ 디렉터리에 위치한다.
<!-- Resolves views selected for rendering by @Controllers to .jsp resources in the /WEB-INF/views directory -->
<beans:bean class="org.springframework.web.servlet.view.InternalResourceViewResolver">
    <beans:property name="prefix" value="/WEB-INF/views/" />
    <beans:property name="suffix" value=".jsp" />
</beans:bean>InternalResourceViewResolver는 뷰로 사용할 jsp 파일을 찾는다.
prefix: 접두사suffix: 접미사.
/WEB-INF/views/[Controller에서 받은 view 정보].jsp에 해당하는 jsp 파일을 찾아서 사용한다.
<context:component-scan base-package="com.company.hello" />com.company.hello 하위 모든 컴포넌트를 사용할 수 있도록 스캔한다.
@Controller, @Service, @Repository 등의 애노테이션을 가진 클래스를 스프링 컨테이너가 관리하도록 한다.
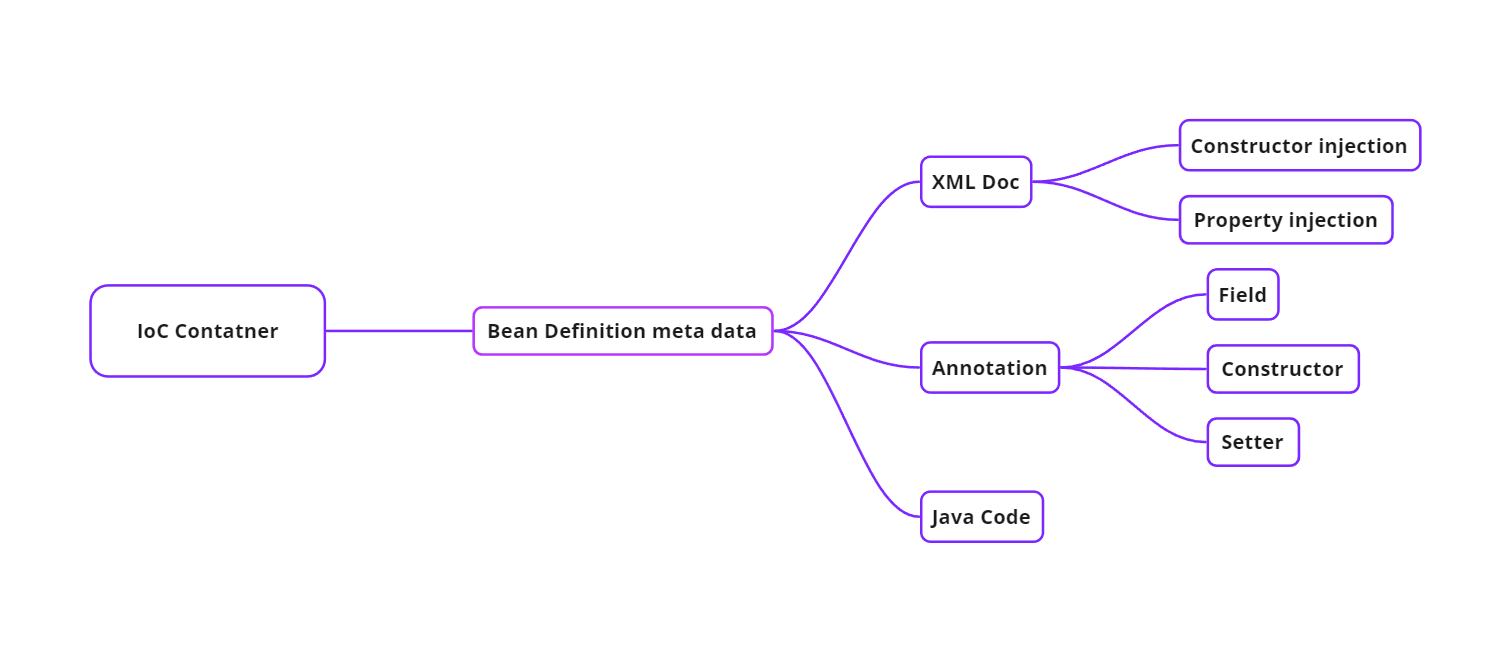
앞서 다룬 xml Doc, Java Code 기반 외에도 Annotation으로도 Bean을 등록할 수 있다.
<context:component-scan base-package="com.company.hello" />단, 이때 xml 설정 파일에 Annotation 붙인 Bean도 Bean으로 등록할 것을 명시해야 한다.
5. 컨트롤러

@Controller
public class HomeController {

    private static final Logger logger = LoggerFactory.getLogger(HomeController.class);

    /**
     * Simply selects the home view to render by returning its name.
     */
    @RequestMapping(value = "/", method = RequestMethod.GET)
    public String home(Locale locale, Model model) {
        logger.info("Welcome home! The client locale is {}.", locale);

        Date date = new Date();
        DateFormat dateFormat = DateFormat.getDateTimeInstance(DateFormat.LONG, DateFormat.LONG, locale);

        String formattedDate = dateFormat.format(date);

        model.addAttribute("serverTime", formattedDate );

        return "home";
    }

}
컨트롤러 객체는 클라이언트의 요청을 처리할 수 있는 메서드를 호출한다.
@Controller
public class HomeController {HomeController를 Controller bean 객체로 사용한다.
@RequestMapping(value = "/", method = RequestMethod.GET)
public String home(Locale locale, Model model) {
@RequestMapping을 사용해서 / url에 home 메서드를 매핑한다.
home 메서드는 Locale 객체와 Model 객체를 입력받는다.
해당 예제에는 없지만 컨트롤러는 모델(서비스)를 호출해 DB와 관련된 클라이언트의 요청을 처리하기도 한다.
model.addAttribute("serverTime", formattedDate );Model 객체에 serverTime이라는 이름으로 formattedDate라는 정보를 저장한다.
return "home";“home”이라는 문자열을 반환한다.
InternalResourceViewResolver를 통해서 사용할 뷰로 /WEB-INF/views/home.jsp를 선택할 수 있다.
실제로 개발자가 많이 작업하는 부분은 Controller, Model(=service), DAO다.
메서드가 작업을 마무리하면 뷰 정보를 반환하고, 반환된 정보를 바탕으로 JSP 파일이 실행된다.
6. 뷰
DispatcherServlet는 뷰 객체를 준비하고 뷰 객체에게 모델의 처리 결과를 전달한다.
Tomcat은 JSP를 실행해서 클라이언트에게 반환할 HTML을 완성한다.
최종적으로 Tomcat은 데이터와 템플릿을 결합하여 HTML을 완성하고 이를 클라이언트에게 전달한다.

'학부 강의 > 웹프로그래밍 (Spring)' 카테고리의 다른 글
| [Spring] 전자 도서관 서비스 1 (0) | 2023.11.08 |
|---|---|
| [Spring] Service, DAO 그리고 VO (0) | 2023.11.07 |
| [Spring] STS, Tomcat (1) | 2023.10.28 |
| [Spring] @Configuration로 Bean 생성하기 (0) | 2023.10.18 |
| [Spring] 의존 객체 자동 주입_2 (1) | 2023.10.18 |