2022. 3. 20. 02:21ㆍ학부 강의/Android_Studio
Button, TextView, EditView, Margin & Padding, Toast
위에 나열한 요소들을 이해하자.
예제를 가지고서 접근해본다.
예제
1. 전화 버튼

사용자 인터페이스 작성(XML) : UI design by using XML
Design
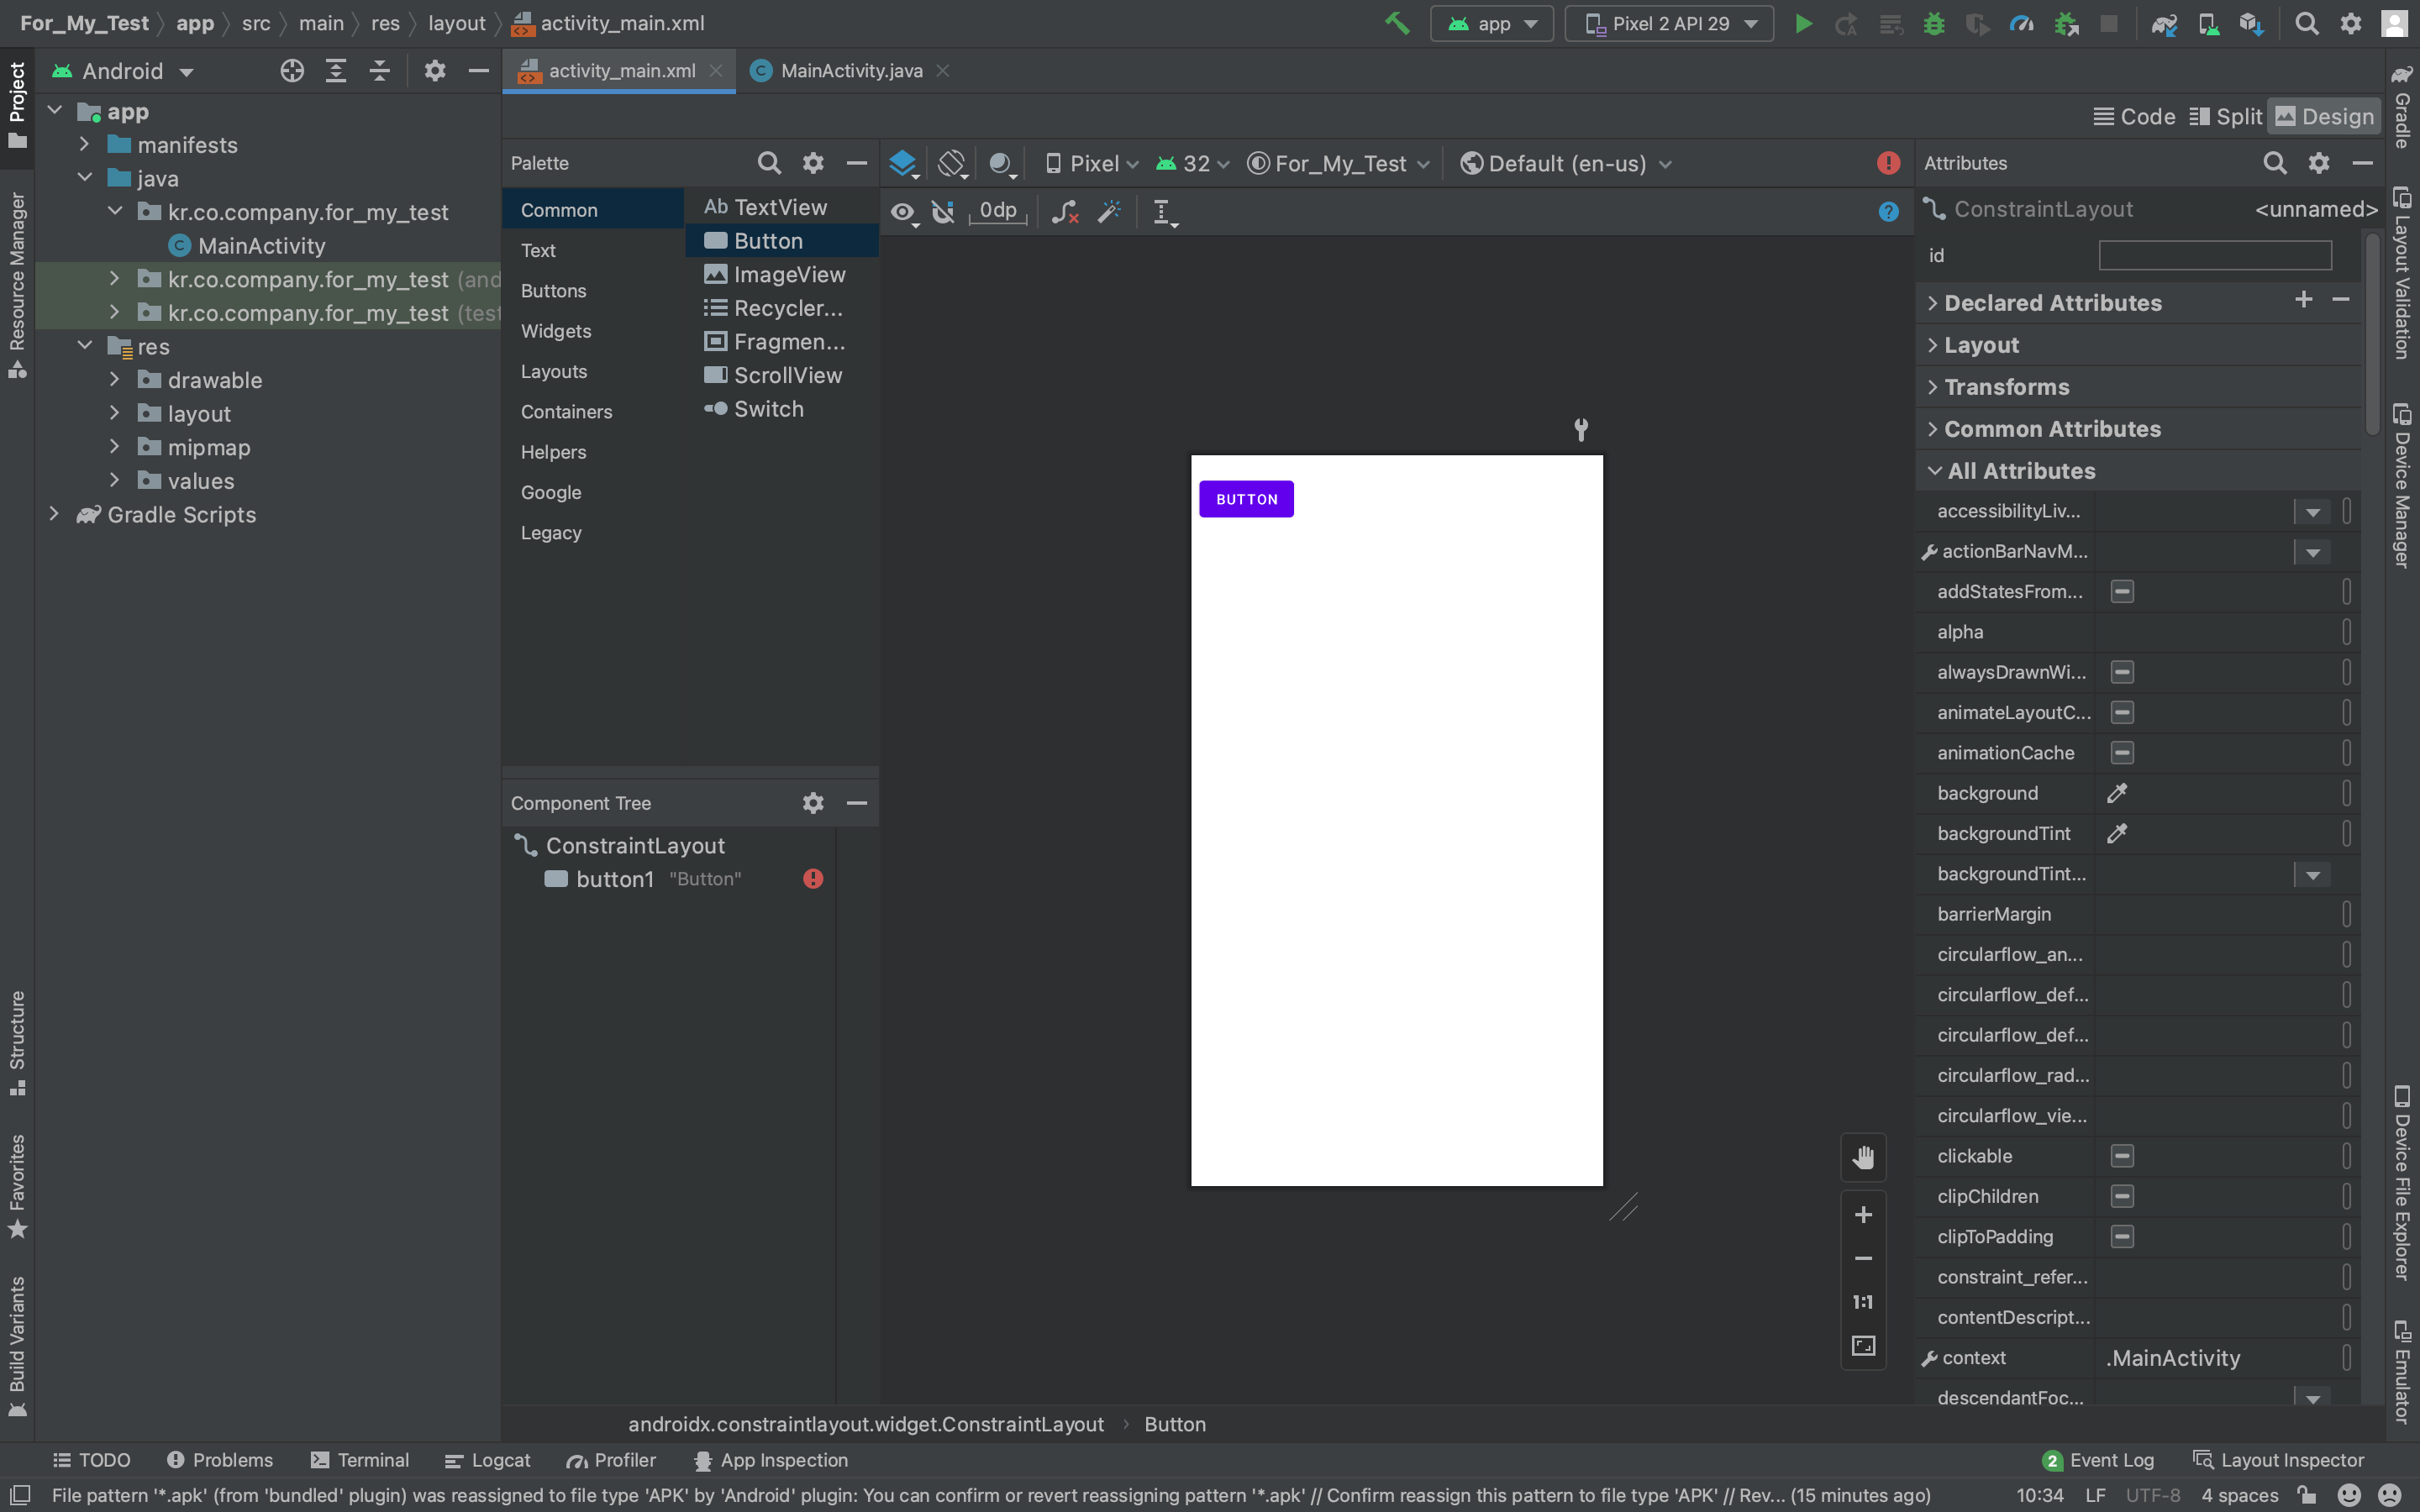
Drag & drop a button.
우측에 Attributes를 통해 속성 값 설정 가능

text : 전화 걸기
onClick : onClicked
Code
<?xml version="1.0" encoding="utf-8"?>
<androidx.constraintlayout.widget.ConstraintLayout xmlns:android="http://schemas.android.com/apk/res/android"
    xmlns:app="http://schemas.android.com/apk/res-auto"
    xmlns:tools="http://schemas.android.com/tools"
    android:layout_width="match_parent"
    android:layout_height="match_parent"
    tools:context=".MainActivity">

    <Button
        android:id="@+id/button1"
        android:layout_width="wrap_content"
        android:layout_height="wrap_content"
        android:onClick="onClicked"
        android:text="전화걸기"
        tools:layout_editor_absoluteX="10dp"
        tools:layout_editor_absoluteY="20dp" />
</androidx.constraintlayout.widget.ConstraintLayout>
Design을 통해서 생성된 xml 코드를 확인할 수 있을 것이다.
자바 코드 작성(JAVA)
package kr.co.company.for_my_test;

import android.os.Bundle;
import android.net.Uri;
import android.content.Intent;
import android.view.View;

import androidx.appcompat.app.AppCompatActivity;

public class MainActivity extends AppCompatActivity {

    @Override
    protected void onCreate(Bundle savedInstanceState) {
        super.onCreate(savedInstanceState);
        setContentView(R.layout.activity_main);
    }

    public void onClicked(View v){
        Intent intent = new Intent(Intent.ACTION_VIEW, Uri.parse("tel:010-1234-5678"));
        startActivity(intent);

    }
}
onClicked() 메소드 생성
Intent intent = new Intent(Intent.ACTION_VIEW, Uri.parse("tel:010-1234-5678"));

startActivity(intent);
마지막 두 라인을 이해하기 위해서 추가적인 학습이 필요함.
컴포넌트
애플리케이션은 컴포넌트로 이루어진다.
- 액티비티(activity): 사용자의 인터페이스 화면을 가지는 하나의 작업을 표시하는 컴포넌트. 액티비티들이 모여 애플리케이션이 된다.
- 서비스(service): 백그라운드에서 실행되는 컴포넌트. 오랫동안 실행되거나 원격 프로세스를 위한 작업
- 방송 수신자(broadcast reciver): 방송을 받고 반응하는 컴포넌트
- 컨텐트 제공자(content provider): 데이터를 관리하고 다른 애플리케이션에게 제공하는 컴포넌트
안드로이드 스튜디오에서는 다른 앱의 컴포넌트를 사용할 수 있다.
이때 앱의 의도(intent)를 적어서 안드로이드에게 전달하면 안드로이드가 가장 적절한 컴포넌트를 찾아서 활성화.
An Intent is a messaging object you can use to request an action from another app component.
Although intents facilitate communication between components in several ways, there are three fundamental use cases.
1. Starting an activity
You can start a new instance of an Activity by passing an Intent to startActivity().
If you want to receive a result from the activity when it finishes, call startActivityForResult().
For more information, see the Activities guide.
Your activity receives the result as a separate Intent object in your activity's onActivityResult() callback.
The Intent describes the activity to start and carries any necessary data.
An Activity represents a single screen in an app.
2. Starting a service
With Android 5.0 (API level 21) and later, you can start a service with JobScheduler.
For versions earlier than Android 5.0 (API level 21), you can start a service by using methods of the Service class.
If the service is designed with a client-server interface, you can bind to the service from another component by passing an Intent to bindService(). For more information, see the Services guide.
You can start a service to perform a one-time operation (such as downloading a file) by passing an Intent to startService().
The Intent describes the service to start and carries any necessary data.
For more information about JobScheduler, see its API-reference documentation.
A Service is a component that performs operations in the background without a user interface.
3. Delivering a broadcast
The system delivers various broadcasts for system events, such as when the system boots up or the device starts charging.
You can deliver a broadcast to other apps by passing an Intent to sendBroadcast() or sendOrderedBroadcast().
A broadcast is a message that any app can receive.
Action : A string that specifies the generic action to perform (such as view or pick).
ACTION_VIEWUse this action in an intent with startActivity() when you have some information that an activity can show to the user, such as a photo to view in a gallery app, or an address to view in a map app.
See the Intentclass reference for more constants that define generic actions.
Data
URI : (Uniform Resource identifier) (통합 자원 식별자)
리소스의 종류를 구분하는 식별자다.
The URI (a Uri object) that references the data to be acted on and/or the MIME type of that data.
The type of data supplied is generally dictated by the intent's action. 자세한 설명은 여기를 참고
Uri.parse(...)
언어학에서 구문 분석 또는 '파싱'은 문장을 그것을 이루고 있는 구성 성분으로 분해하고 그들 사이의 위계 관계를 분석하여 문장의 구조를 결정하는 것을 말한다.
컴퓨터 과학에서 파싱은 일련의 문자열을 의미 있는 토큰으로 분해하고 이들로 이루어진 파스 트리를 만드는 과정을 말한다.
그래서 컴파일러의 구문분석기를 Syntax Analyzer 또는 파서(Parser)라고 부르기도 한다.
아무튼 Uri.parse(..)는 Data를 Uri로 리소스의 종류를 식별하고 구문을 분석하는 명령어다.
“tel:010-1234-5678”를 전화번호로 식별하고 구문을 해석, 전화번호를 View하기 가장 적합한 다른 APP의 Activity로 요청을 보낸다.
출처:https://developer.android.com/guide/components/intents-filters#java
인텐트 및 인텐트 필터 | Android 개발자 | Android Developers
An Intent is a messaging object you can use to request an action from another app component . Although intents facilitate communication between components in several ways, there are three fundamental use cases: An Activity represents a single screen in…
developer.android.com
URI, URL, URN 의 차이 한 번에 정리하기 : 리소스 구분 관점에서 보는 URI, URL, URN의 차이
URI란? URI란 Uniform Resource Identifier의 약자이다. 즉 아래와 같이 해석될 수 있다. URI는 리소스를 구분할 수 있는 식별자이다. URI를 통해 우리가 접근해야 하는 리소스가 어디 있는지 알 수 있으며, UR
kotlinworld.com
2. 배경 색상, 투명 버튼

배경 색상 변경하기.
일반 버튼 생성
버튼 투명하게 만들기.
버튼 색상 변경하기.
사용자 인터페이스 작성(XML) : UI design by using XML
Code
<?xml version="1.0" encoding="utf-8"?>
<androidx.constraintlayout.widget.ConstraintLayout xmlns:android="http://schemas.android.com/apk/res/android"
    xmlns:app="http://schemas.android.com/apk/res-auto"
    xmlns:tools="http://schemas.android.com/tools"
    android:layout_width="match_parent"
    android:layout_height="match_parent"
    tools:context=".MainActivity"
    android:background="#AAB9FF">

    <Button
        android:id="@+id/button1"
        android:layout_width="wrap_content"
        android:layout_height="wrap_content"
        android:onClick="onClicked"
        android:text="일반버튼"
        tools:layout_editor_absoluteX="10dp"
        tools:layout_editor_absoluteY="20dp"
        />

    <Button
        android:id="@+id/button2"
        android:layout_width="wrap_content"
        android:layout_height="wrap_content"
        android:onClick="onClicked"
        android:text="투명버튼"
        android:visibility="invisible"
        tools:layout_editor_absoluteX="10dp"
        tools:layout_editor_absoluteY="70dp"
        />
    <Button
        android:id="@+id/button"
        android:layout_width="wrap_content"
        android:layout_height="wrap_content"
        android:onClick="onClicked"
        android:text="색상변경버튼"
        tools:layout_editor_absoluteX="10dp"
        tools:layout_editor_absoluteY="120dp"
        android:backgroundTint="#6E6EFF"
        />

</androidx.constraintlayout.widget.ConstraintLayout>
색상

색상을 표현할 땐 16진수 표현을 사용한다.
색상표 참고
색상을 설정하는 다른 방법 : @color/원하는 색상 입력 (ex. @color/black)
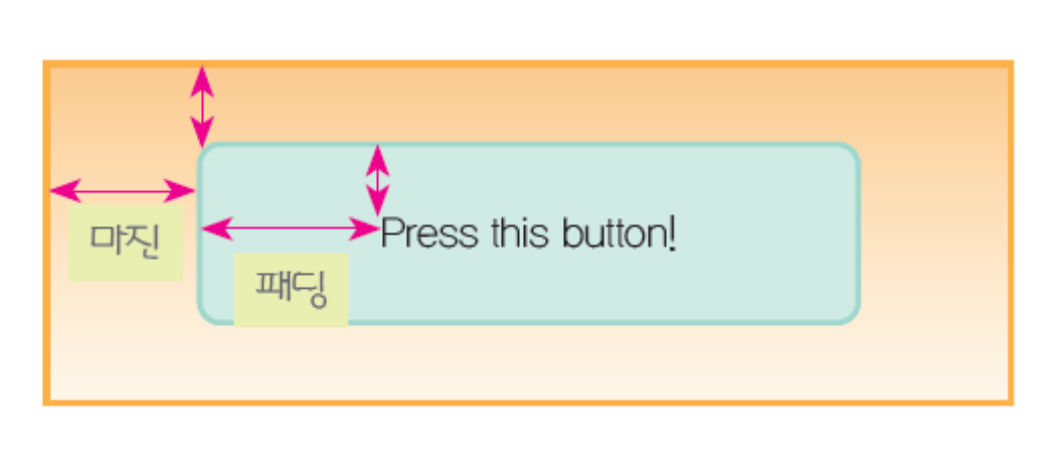
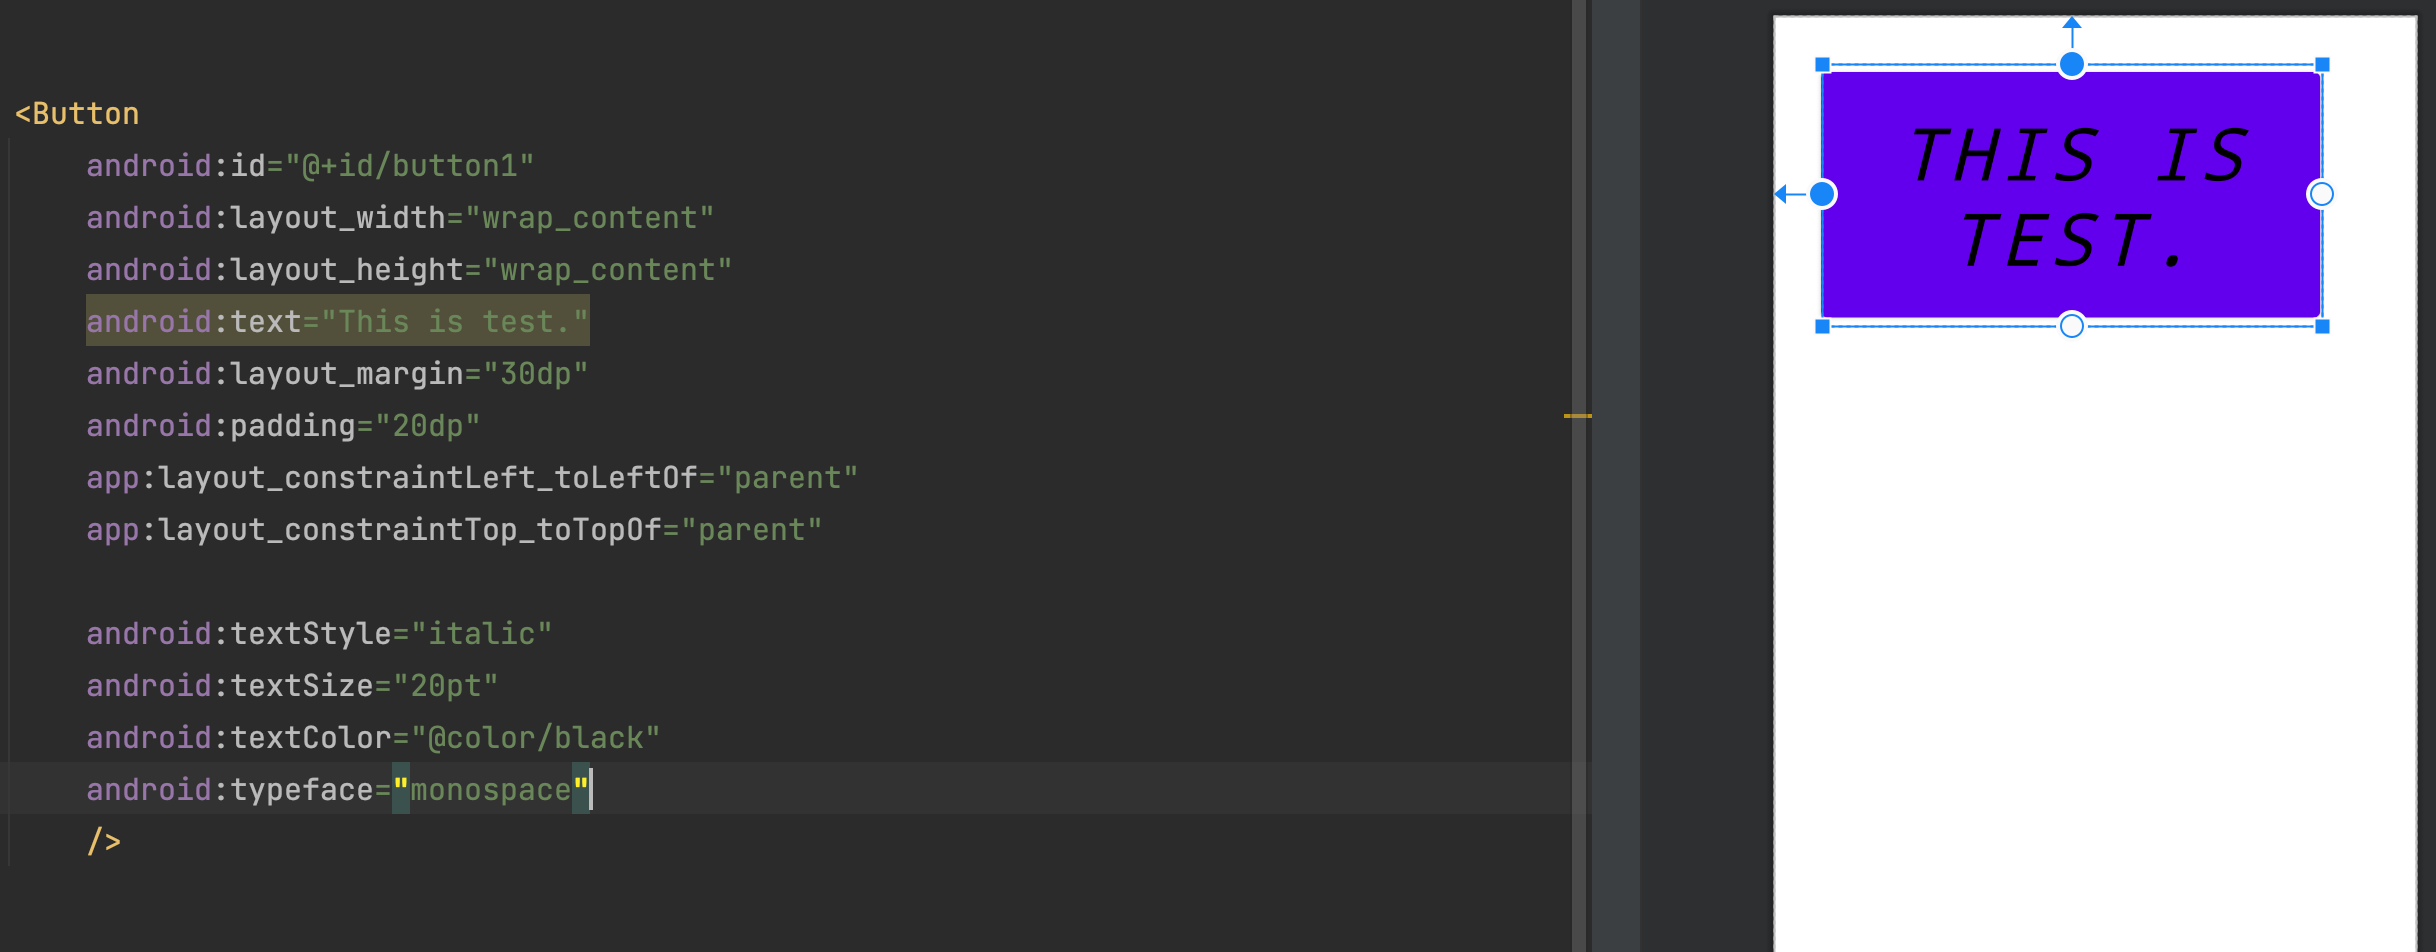
3. 마진과 패딩
<?xml version="1.0" encoding="utf-8"?>
<androidx.constraintlayout.widget.ConstraintLayout xmlns:android="http://schemas.android.com/apk/res/android"
    xmlns:app="http://schemas.android.com/apk/res-auto"
    xmlns:tools="http://schemas.android.com/tools"
    android:layout_width="match_parent"
    android:layout_height="match_parent"
    tools:context=".MainActivity">

    <Button
        android:id="@+id/button1"
        android:layout_width="wrap_content"
        android:layout_height="wrap_content"
        android:backgroundTint="@color/purple_200"
        android:padding="20dp"
        android:text="마진 30dp, 패딩 20dp"
        />

    <Button
        android:id="@+id/button2"
        android:layout_width="wrap_content"
        android:layout_height="wrap_content"
        android:backgroundTint="@color/purple_200"
        android:padding="30dp"
        android:text="마진 30dp, 패딩 30dp"
         />

</androidx.constraintlayout.widget.ConstraintLayout>
예상과는 다른 결과물이 생성되었다.
Padding의 경우 문제가 없이 결과물에 잘 반영된 반면에 Margin은 그렇지 않다.
그 원인은 우리가 constraintlayout의 사용했기 때문이다.
constraintlayout은 자식 뷰 위젯에 여백 관련 속성을 사용해도 무조건 적용되는 것은 아니다.
여백 속성이 적용되려면, 제약(Constraint)이 명시적으로 지정되어야 한다.
해당 사이드에 상대 위치 지정(Relative Positioning) 제약이 적용되어야 하며, 만약 아무런 제약 없이 여백만 사용하면 그 여백 설정은 무시된다고 합니다.
여기서 상대 위치 지정(Relative Positioning)이란 쉽게 말해 어디를 기준으로 마진 효과를 적용할 것인지 지정해주어야 한다는 뜻입니다.
그래서 코드를 수정해보면...
<?xml version="1.0" encoding="utf-8"?>
<androidx.constraintlayout.widget.ConstraintLayout xmlns:android="http://schemas.android.com/apk/res/android"
    xmlns:app="http://schemas.android.com/apk/res-auto"
    xmlns:tools="http://schemas.android.com/tools"
    android:layout_width="match_parent"
    android:layout_height="match_parent"
    tools:context=".MainActivity">

    <Button
        android:id="@+id/button1"
        android:layout_width="wrap_content"
        android:layout_height="wrap_content"
        android:backgroundTint="@color/purple_200"
        android:text="마진 30dp, 패딩 20dp"
        android:padding="20dp"
        android:layout_margin="30dp"
        app:layout_constraintLeft_toLeftOf="parent"
        app:layout_constraintTop_toTopOf="parent"
        />

    <Button
        android:id="@+id/button2"
        android:layout_width="wrap_content"
        android:layout_height="wrap_content"
        android:backgroundTint="@color/purple_200"
        android:text="마진 30dp, 패딩 30dp"
        android:padding="30dp"
        android:layout_margin="30dp"
        app:layout_constraintLeft_toLeftOf="parent"
        app:layout_constraintTop_toBottomOf="@id/button1"
        />

</androidx.constraintlayout.widget.ConstraintLayout>
따단~!
참고 : https://recipes4dev.tistory.com/162
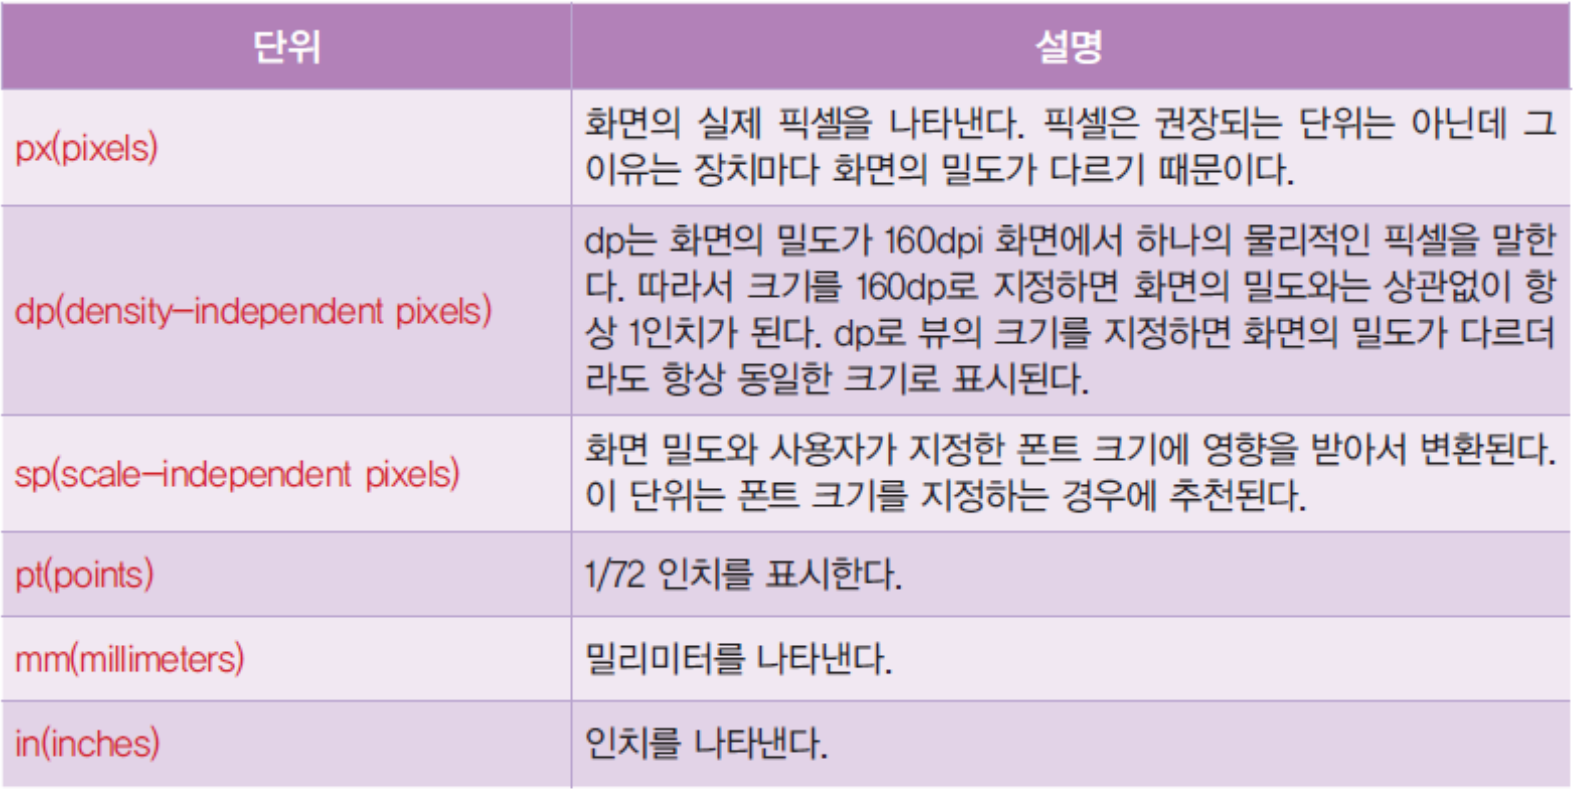
뷰의 크기 단위
4. enable속성과 rotation속성

<?xml version="1.0" encoding="utf-8"?>
<androidx.constraintlayout.widget.ConstraintLayout xmlns:android="http://schemas.android.com/apk/res/android"
xmlns:app="http://schemas.android.com/apk/res-auto"
xmlns:tools="http://schemas.android.com/tools"
android:layout_width="match_parent"
android:layout_height="match_parent"
tools:context=".MainActivity"
>
<Button
android:id="@+id/button1"
android:layout_width="wrap_content"
android:layout_height="wrap_content"
android:text="마진 30dp, 패딩 20dp"
android:layout_margin="30dp"
android:padding="20dp"
app:layout_constraintLeft_toLeftOf="parent"
app:layout_constraintTop_toTopOf="parent"
/>
<Button
android:id="@+id/button2"
android:layout_width="wrap_content"
android:layout_height="wrap_content"
android:text="enable"
android:layout_margin="30dp"
android:padding="20dp"
app:layout_constraintLeft_toLeftOf="parent"
app:layout_constraintTop_toBottomOf="@id/button1"
android:enabled="false"
/>
<Button
android:id="@+id/button3"
android:layout_width="wrap_content"
android:layout_height="wrap_content"
android:text="rotation"
android:layout_margin="30dp"
android:padding="20dp"
app:layout_constraintLeft_toLeftOf="parent"
app:layout_constraintTop_toBottomOf="@id/button2"
android:rotation="25"
/>
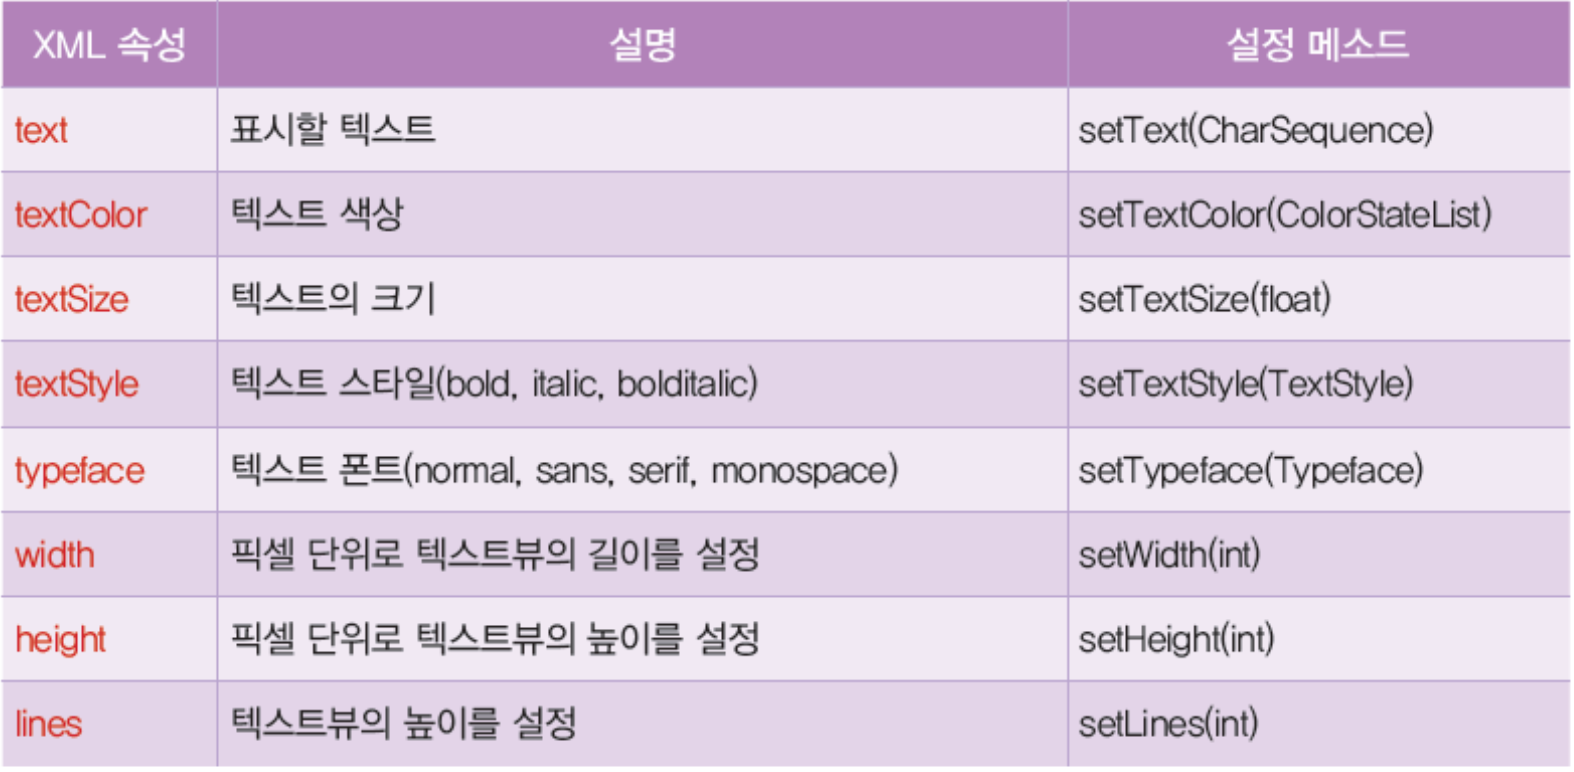
</androidx.constraintlayout.widget.ConstraintLayout>5. 텍스트뷰의 속성
6. 이미지버튼 이벤트 처리

사용자 인터페이스 작성(XML) : UI design by using XML
<?xml version="1.0" encoding="utf-8"?>
<androidx.constraintlayout.widget.ConstraintLayout xmlns:android="http://schemas.android.com/apk/res/android"
    xmlns:app="http://schemas.android.com/apk/res-auto"
    xmlns:tools="http://schemas.android.com/tools"
    android:layout_width="match_parent"
    android:layout_height="match_parent"
    tools:context=".MainActivity">

    <ImageButton
        android:id="@+id/imageButton1"
        android:layout_width="wrap_content"
        android:layout_height="wrap_content"

        android:onClick="onClick"
        android:src="@drawable/ic_launcher_foreground"

        app:layout_constraintBottom_toBottomOf="parent"
        app:layout_constraintEnd_toEndOf="parent"
        app:layout_constraintStart_toStartOf="parent"
        app:layout_constraintTop_toTopOf="parent"
        />

</androidx.constraintlayout.widget.ConstraintLayout>
자바 코드 작성 (JAVA)
package kr.co.company.for_my_test;

import android.os.Bundle;
import android.view.View;
import android.widget.Toast;

import androidx.appcompat.app.AppCompatActivity;

public class MainActivity extends AppCompatActivity {

    @Override
    protected void onCreate(Bundle savedInstanceState) {
        super.onCreate(savedInstanceState);
        setContentView(R.layout.activity_main);
    }

    public void onClick(View target){
        Toast.makeText(getApplicationContext(),"버튼이 눌렸습니다.", Toast.LENGTH_SHORT).show();
    }
}
토스트 메시지
Toast.makeText(getApplicationContext(),"버튼이 눌렸습니다.", Toast.LENGTH_SHORT).show();
A toast provides simple feedback about an operation in a small popup.
It only fills the amount of space required for the message and the current activity remains visible and interactive.
Toasts automatically disappear after a timeout.
토스트는 화면 아래 작은 팝업을 생성한다.
Instantiate a Toast object
Use the makeText() method, which takes the following parameters:
- The application
Context. - The text that should appear to the user.
- The duration that the toast should remain on the screen.
The makeText() method returns a properly initialized Toast object.
우리가 토스트를 생성하기 위해서는 the application Context, 화면아래 띄울 문장, 지속 시간을 설정해주어야 한다.
Show the toast
To display the toast, call the show()method.
토스트 객체를 생성한 후 보여주기 위해서 show() method를 사용
출처: https://developer.android.com/guide/topics/ui/notifiers/toasts
토스트 메시지 개요 | Android 개발자 | Android Developers
토스트 메시지 개요 토스트 메시지는 작은 팝업으로 작업에 관한 간단한 피드백을 제공합니다. 메시지에 필요한 공간만 차지하며 진행 중인 활동은 그대로 표시되고 상호작용도 유지됩니다. 토
developer.android.com
7. 다양한 Edit Text

자바 코드 작성 (JAVA)
<?xml version="1.0" encoding="utf-8"?>
<androidx.constraintlayout.widget.ConstraintLayout xmlns:android="http://schemas.android.com/apk/res/android"
    xmlns:app="http://schemas.android.com/apk/res-auto"
    xmlns:tools="http://schemas.android.com/tools"
    android:layout_width="match_parent"
    android:layout_height="match_parent"
    tools:context=".MainActivity">

    <EditText
        android:id="@+id/edit1"
        android:layout_width="match_parent"
        android:layout_height="wrap_content"
        android:hint="ID"
        android:inputType="text"

        android:layout_margin="20dp"
        app:layout_constraintLeft_toLeftOf="parent"
        app:layout_constraintTop_toTopOf="parent"
        />

    <EditText
        android:id="@+id/edit2"
        android:layout_width="match_parent"
        android:layout_height="wrap_content"
        android:hint="PASSWORD"
        android:inputType="numberPassword"

        android:layout_margin="20dp"
        app:layout_constraintLeft_toLeftOf="parent"
        app:layout_constraintTop_toBottomOf="@id/edit1"
        />

    <EditText
        android:id="@+id/edit3"
        android:layout_width="match_parent"
        android:layout_height="wrap_content"
        android:hint="010-XXXX-XXXX"
        android:inputType="phone"

        android:layout_margin="20dp"
        app:layout_constraintLeft_toLeftOf="parent"
        app:layout_constraintTop_toBottomOf="@id/edit2"
        />

</androidx.constraintlayout.widget.ConstraintLayout>
Edit Text 속성

'학부 강의 > Android_Studio' 카테고리의 다른 글
| 2022-04-03 Android_Studio_5 (0) | 2022.04.04 |
|---|---|
| 2022-04-01 IdeaVim (0) | 2022.04.01 |
| 2022-03-25 Android_Studio_4 (0) | 2022.03.26 |
| 2022-03-13 Android_Studio_2 (0) | 2022.03.13 |
| 2022-03-11 Android_studio_1 (0) | 2022.03.13 |