2022. 4. 4. 08:41ㆍ학부 강의/Android_Studio
xmlns이란?
xmlns:android="http://schemas.android.com/apk/res/android"안드로이드 스튜디오를 사용하면서 항상 보는 코드다.
어떤 의미가 있는 코드일까?
XML namespace
xmlns:namespace-prefix="namespaceURI"xmlns는 xml namespace를 뜻한다.
namespace는 이름 충돌을 피하기 위해 사용
prefix는 검색 결과 한국어로는 접두사라고 많이 말한다.
접두사를 붙여서 이름이 같지만 다른 라이브러리에서 온 요소들을 구별한다.
철수가 두 명 있어서 성을 붙여서 김철수, 이철수로 부르는 것과 같다.
하지만 prefix(접두사)는 반드시 android일 필요 없다.
xmlns:and="http://schemas.android.com/apk/res/android"and로 바꿔도 잘 돌아간다.
물론 나머지 코드에서 android:를 and:로 모두 수정할 필요가 있다.
이에 반해 value에 해당하는 주소 값 "http://schemas.android.com/apk/res/android"는 조금만 변경되어도 문제가 발생한다.
이를 통해서 namespaceURI 부분이 핵심이라는 사실을 알 수 있다.
schemas.android.com = 안드로이드 스키마
/apk/res/android = 앱/리소스/ 패키지
안드로이드 스키마는 android라는 패키지명의 앱 리소스를 참조한다
그리고 해당 위치에서 참조하는 것들은 and:로 불러 구별하겠다는 의미.
참고 : https://develop88.tistory.com/entry/안드로이드-xmlns-안드로이드-스키마
참고 : https://dreamaz.tistory.com/229
참고 : https://velog.io/@younsle/XML-속성-정리-o7k11q4fx9
온도 변환 앱 만들기

activity_main.xml
<?xml version="1.0" encoding="utf-8"?>
<androidx.constraintlayout.widget.ConstraintLayout xmlns:android="http://schemas.android.com/apk/res/android"
    xmlns:app="http://schemas.android.com/apk/res-auto"
    xmlns:tools="http://schemas.android.com/tools"
    android:layout_width="match_parent"
    android:layout_height="match_parent"
    tools:context=".MainActivity">

    <EditText
        android:id="@+id/tem"
        android:inputType="text"
        android:hint="celsius"
        android:ems="10"
        android:layout_width="wrap_content"
        android:layout_height="wrap_content"

        android:layout_margin="20dp"
        app:layout_constraintTop_toTopOf="parent"
        app:layout_constraintLeft_toLeftOf="parent"
        />

    <Button
        android:id="@+id/button"
        android:text="변환"
        android:layout_width="wrap_content"
        android:layout_height="wrap_content"
        android:onClick="onClicked"

        android:layout_margin="20dp"
        app:layout_constraintTop_toBottomOf="@id/radioGroup"
        app:layout_constraintLeft_toLeftOf="parent"
        />

    <RadioGroup
        android:id="@+id/radioGroup"
        android:layout_width="225dp"
        android:layout_height="141dp"

        android:layout_margin="20dp"
        app:layout_constraintTop_toBottomOf="@id/tem"
        app:layout_constraintLeft_toLeftOf="parent"
       >

        <RadioButton
            android:id="@+id/radioButton1"
            android:text="섭씨"
            android:layout_width="wrap_content"
            android:layout_height="wrap_content"

            android:layout_margin="10dp"
            app:layout_constraintLeft_toLeftOf="@id/radioGroup"
            app:layout_constraintTop_toBottomOf="@+id/radioGroup" />

        <RadioButton
            android:id="@+id/radioButton2"
            android:text="화씨"
            android:layout_width="wrap_content"
            android:layout_height="wrap_content"

            android:layout_margin="10dp"
            app:layout_constraintLeft_toLeftOf="@id/radioGroup"
            app:layout_constraintTop_toBottomOf="@+id/radioButton1"
            />

    </RadioGroup>
</androidx.constraintlayout.widget.ConstraintLayout>
RadioButton과 RadioGroup
RadioGroup에 여러 RadioButton들을 넣는다.
같은 RadioGroup에 속한다면 단 하나의 RadioButton만이 체크될 수 있다.
<RadioGroup>와 </RadioGroup> 사이에 RadioButton을 배치하면 그룹에 포함시킬 수 있다.
MainActivity.java
package kr.co.company.project0401;

import androidx.appcompat.app.AppCompatActivity;

import android.os.Bundle;
import android.view.View;
import android.widget.EditText;
import android.widget.RadioButton;
import android.widget.Toast;

public class MainActivity extends AppCompatActivity {
    private EditText text;

    @Override
    protected void onCreate(Bundle savedInstanceState) {
        super.onCreate(savedInstanceState);
        setContentView(R.layout.activity_main);
        text = (EditText) findViewById(R.id.tem);
    }

    public void onClicked(View view){
        switch (view.getId()){
            case R.id.button:
                RadioButton celsiusButton = (RadioButton) findViewById(R.id.radioButton1);
                RadioButton fahrenheitButton = (RadioButton) findViewById(R.id.radioButton2);

                if (text.getText().length()==0){
                    Toast.makeText(this,"정확한 값을 입력하시오", Toast.LENGTH_LONG).show();
                    return;
                }

                float inputValue = Float.parseFloat(text.getText().toString());

                if (celsiusButton.isChecked()){
                    text.setText(String.valueOf(convertFahrenheitToCelsius(inputValue)));
                    celsiusButton.setChecked(false);
                    fahrenheitButton.setChecked(true);
                }else{
                    text.setText(String.valueOf(convertCelsiusToFahrenhit(inputValue)));
                    celsiusButton.setChecked(true);
                    fahrenheitButton.setChecked(false);
                }
                break;
        }
    }
    private  double convertFahrenheitToCelsius(float fahrenheit){
        return ((fahrenheit-32)*5/9.0);
    }
    private double  convertCelsiusToFahrenhit(float celsius){
        return  (((celsius*9)/5)+32.0);
    }
//    private  float convertFahrenheitToCelsius(float fahrenheit){
//        return ((fahrenheit-32)*5/9.0f);
//    }
//    private float  convertCelsiusToFahrenhit(float celsius){
//        return  (((celsius*9)/5)+32.0f);
//    }

}text.getText()
text.setText()EditText의 텍스트 값을 가져오고 설정하는 방법이다.
float inputValue = Float.parseFloat(text.getText().toString());parseFloat(String) : 문자열을 부동소수점으로 변환.
.toString()
: getText() 함수가 리턴하는 타입은 String 클래스 타입을 리턴하지 않고, Editable 인터페이스 타입을 리턴.
그래서 String 타입으로 텍스트를 사용하려면 따로 변환해야 함.
Editable 인터페이스의 .toString()로 String 타입으로 변환.
참고: https://recipes4dev.tistory.com/61
text.setText(String.valueOf(convertFahrenheitToCelsius(inputValue)));String.valueOf() : 문자열로 변환
parseFloat(), .toString, .valueOf 형변환을 하는 여러 가지 방법이 나온다.
celsiusButton.isChecked()

celsiusButton.setChecked(false);
fahrenheitButton.setChecked(true);
.isChecked() .setChecked() 로 버튼의 체크 여부를 확인하고 설정할 수 있다.
Drawable animation
영화 필름처럼 여러 개의 이미지가 순서대로 재생되어서 생성되는 전통적인 애니메이션
걸어가는 스머프를 만들어보았다.
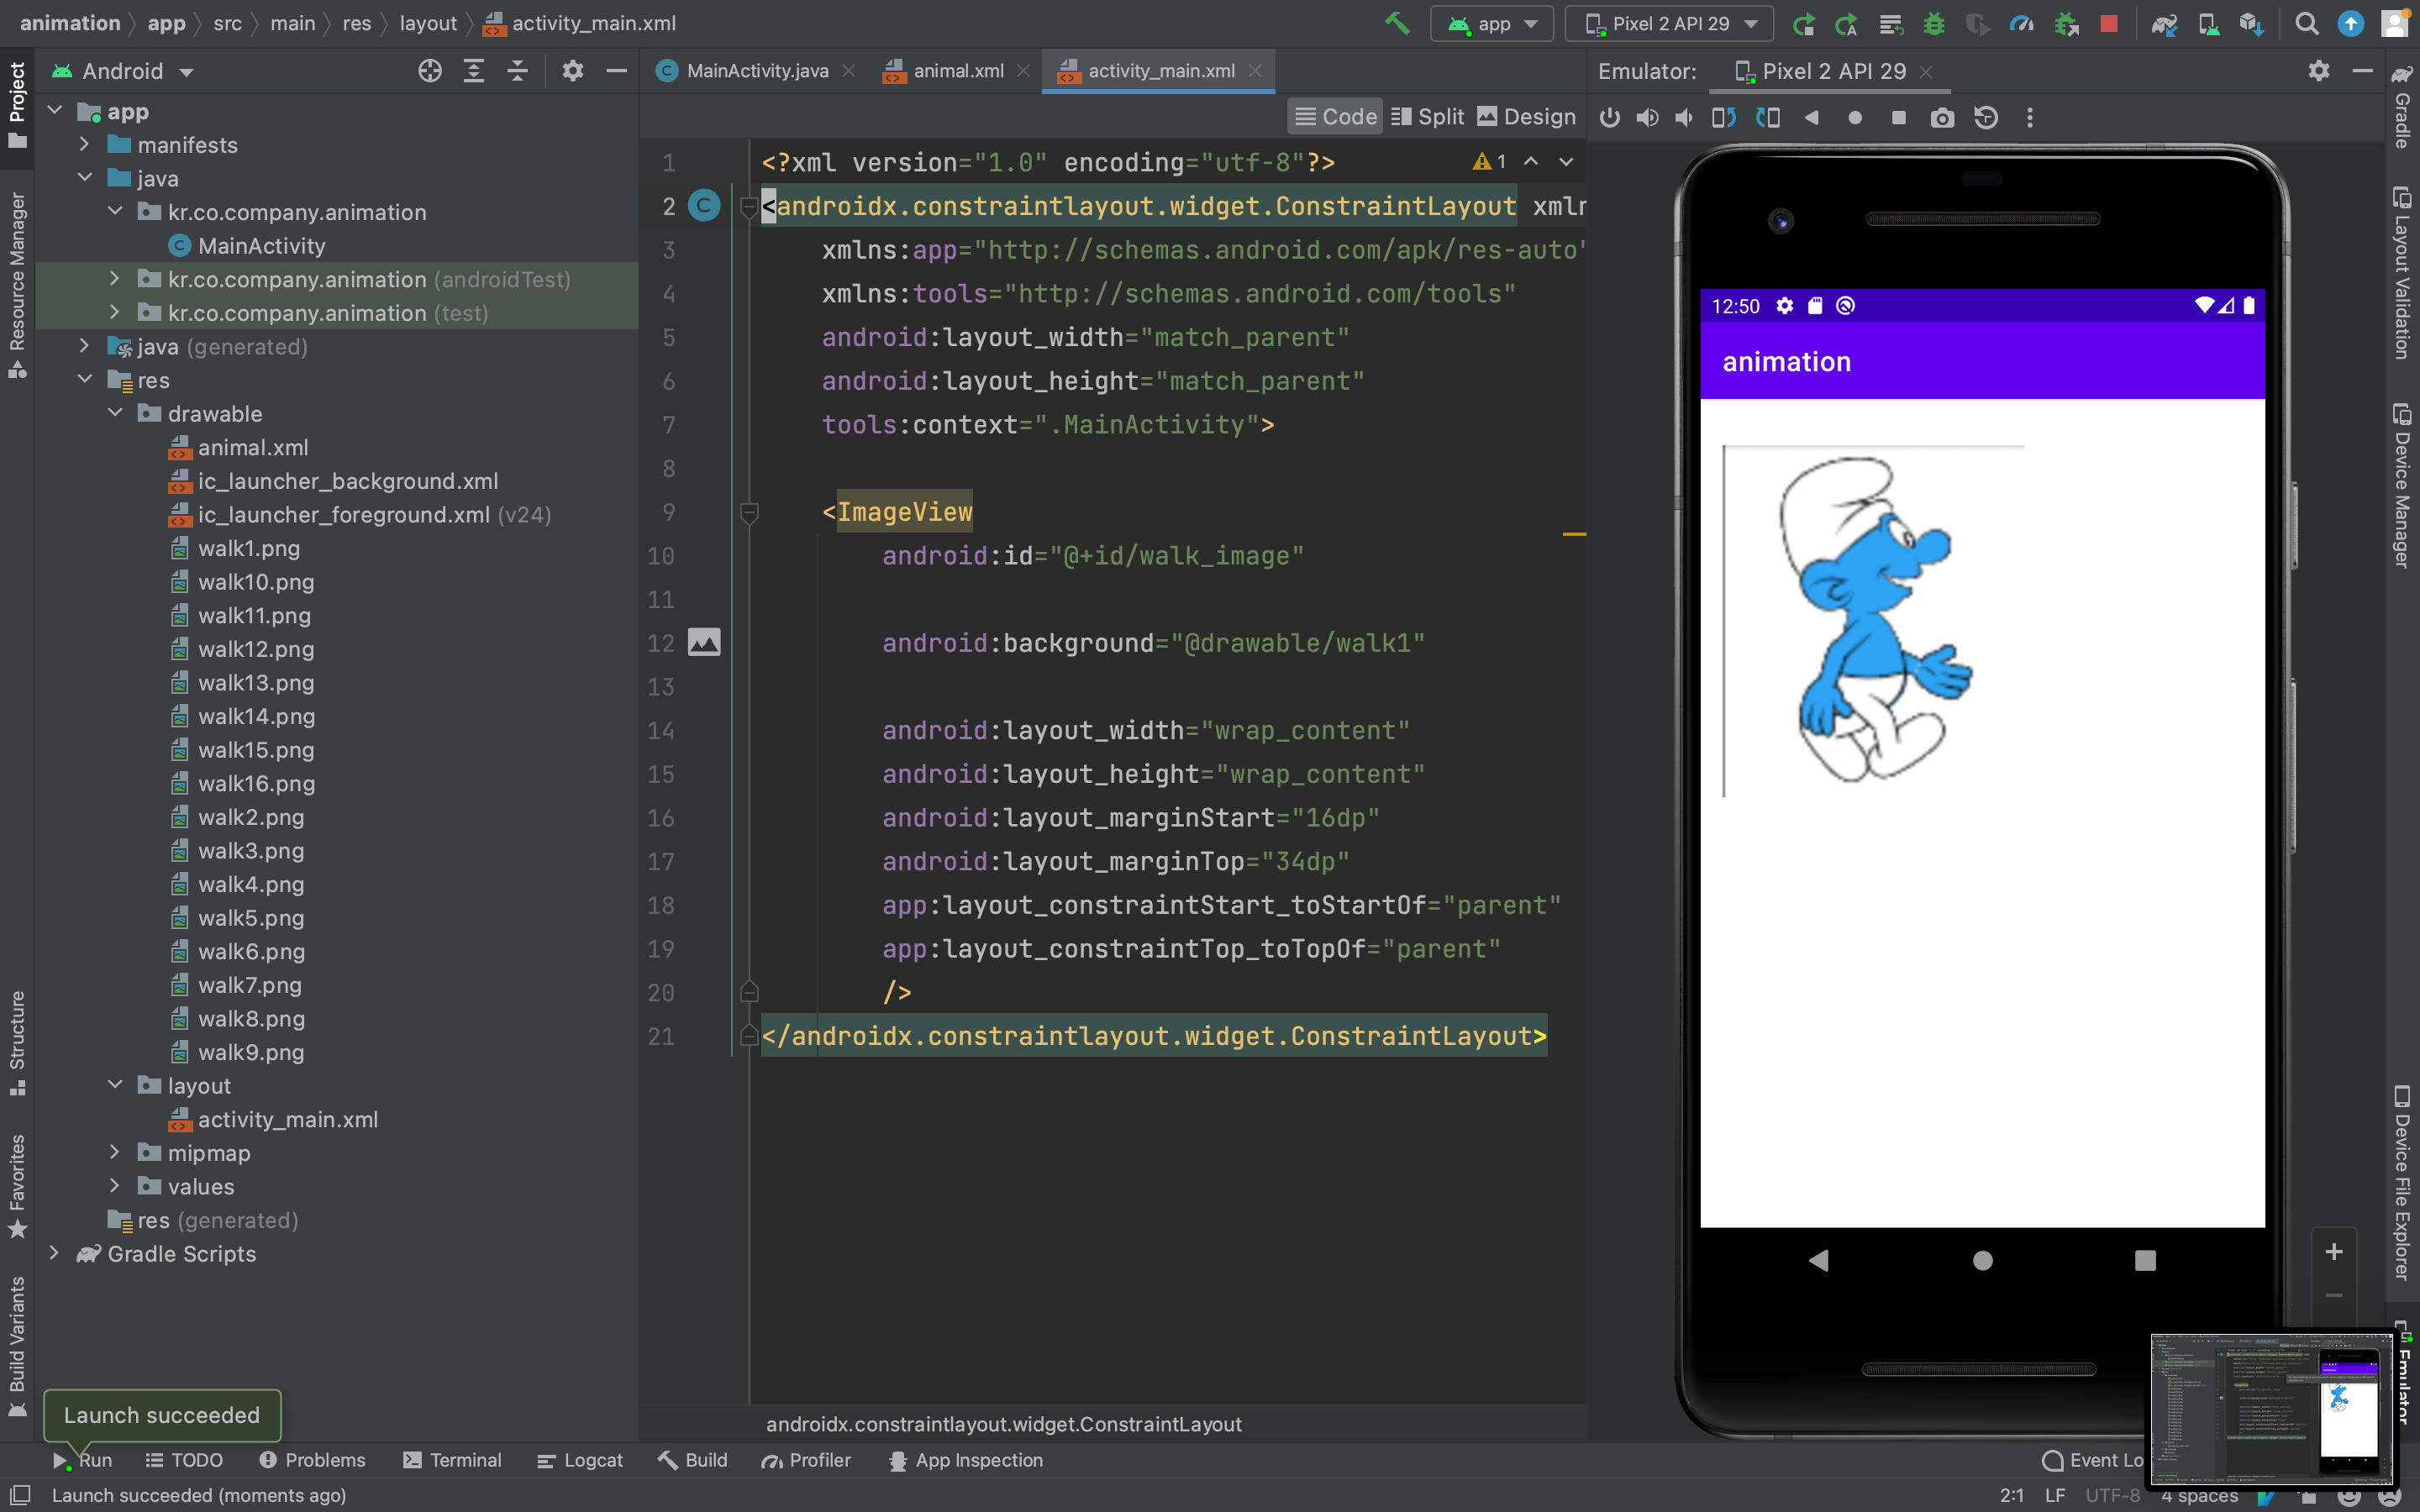

res/drawable 아래에 animal.xml 추가된 것을 확인할 수 있음.

대충 이렇게 animal.xml에서 item의 리스트를 만들고 그걸 activity_main.xml의 imageView에서 보여준다.
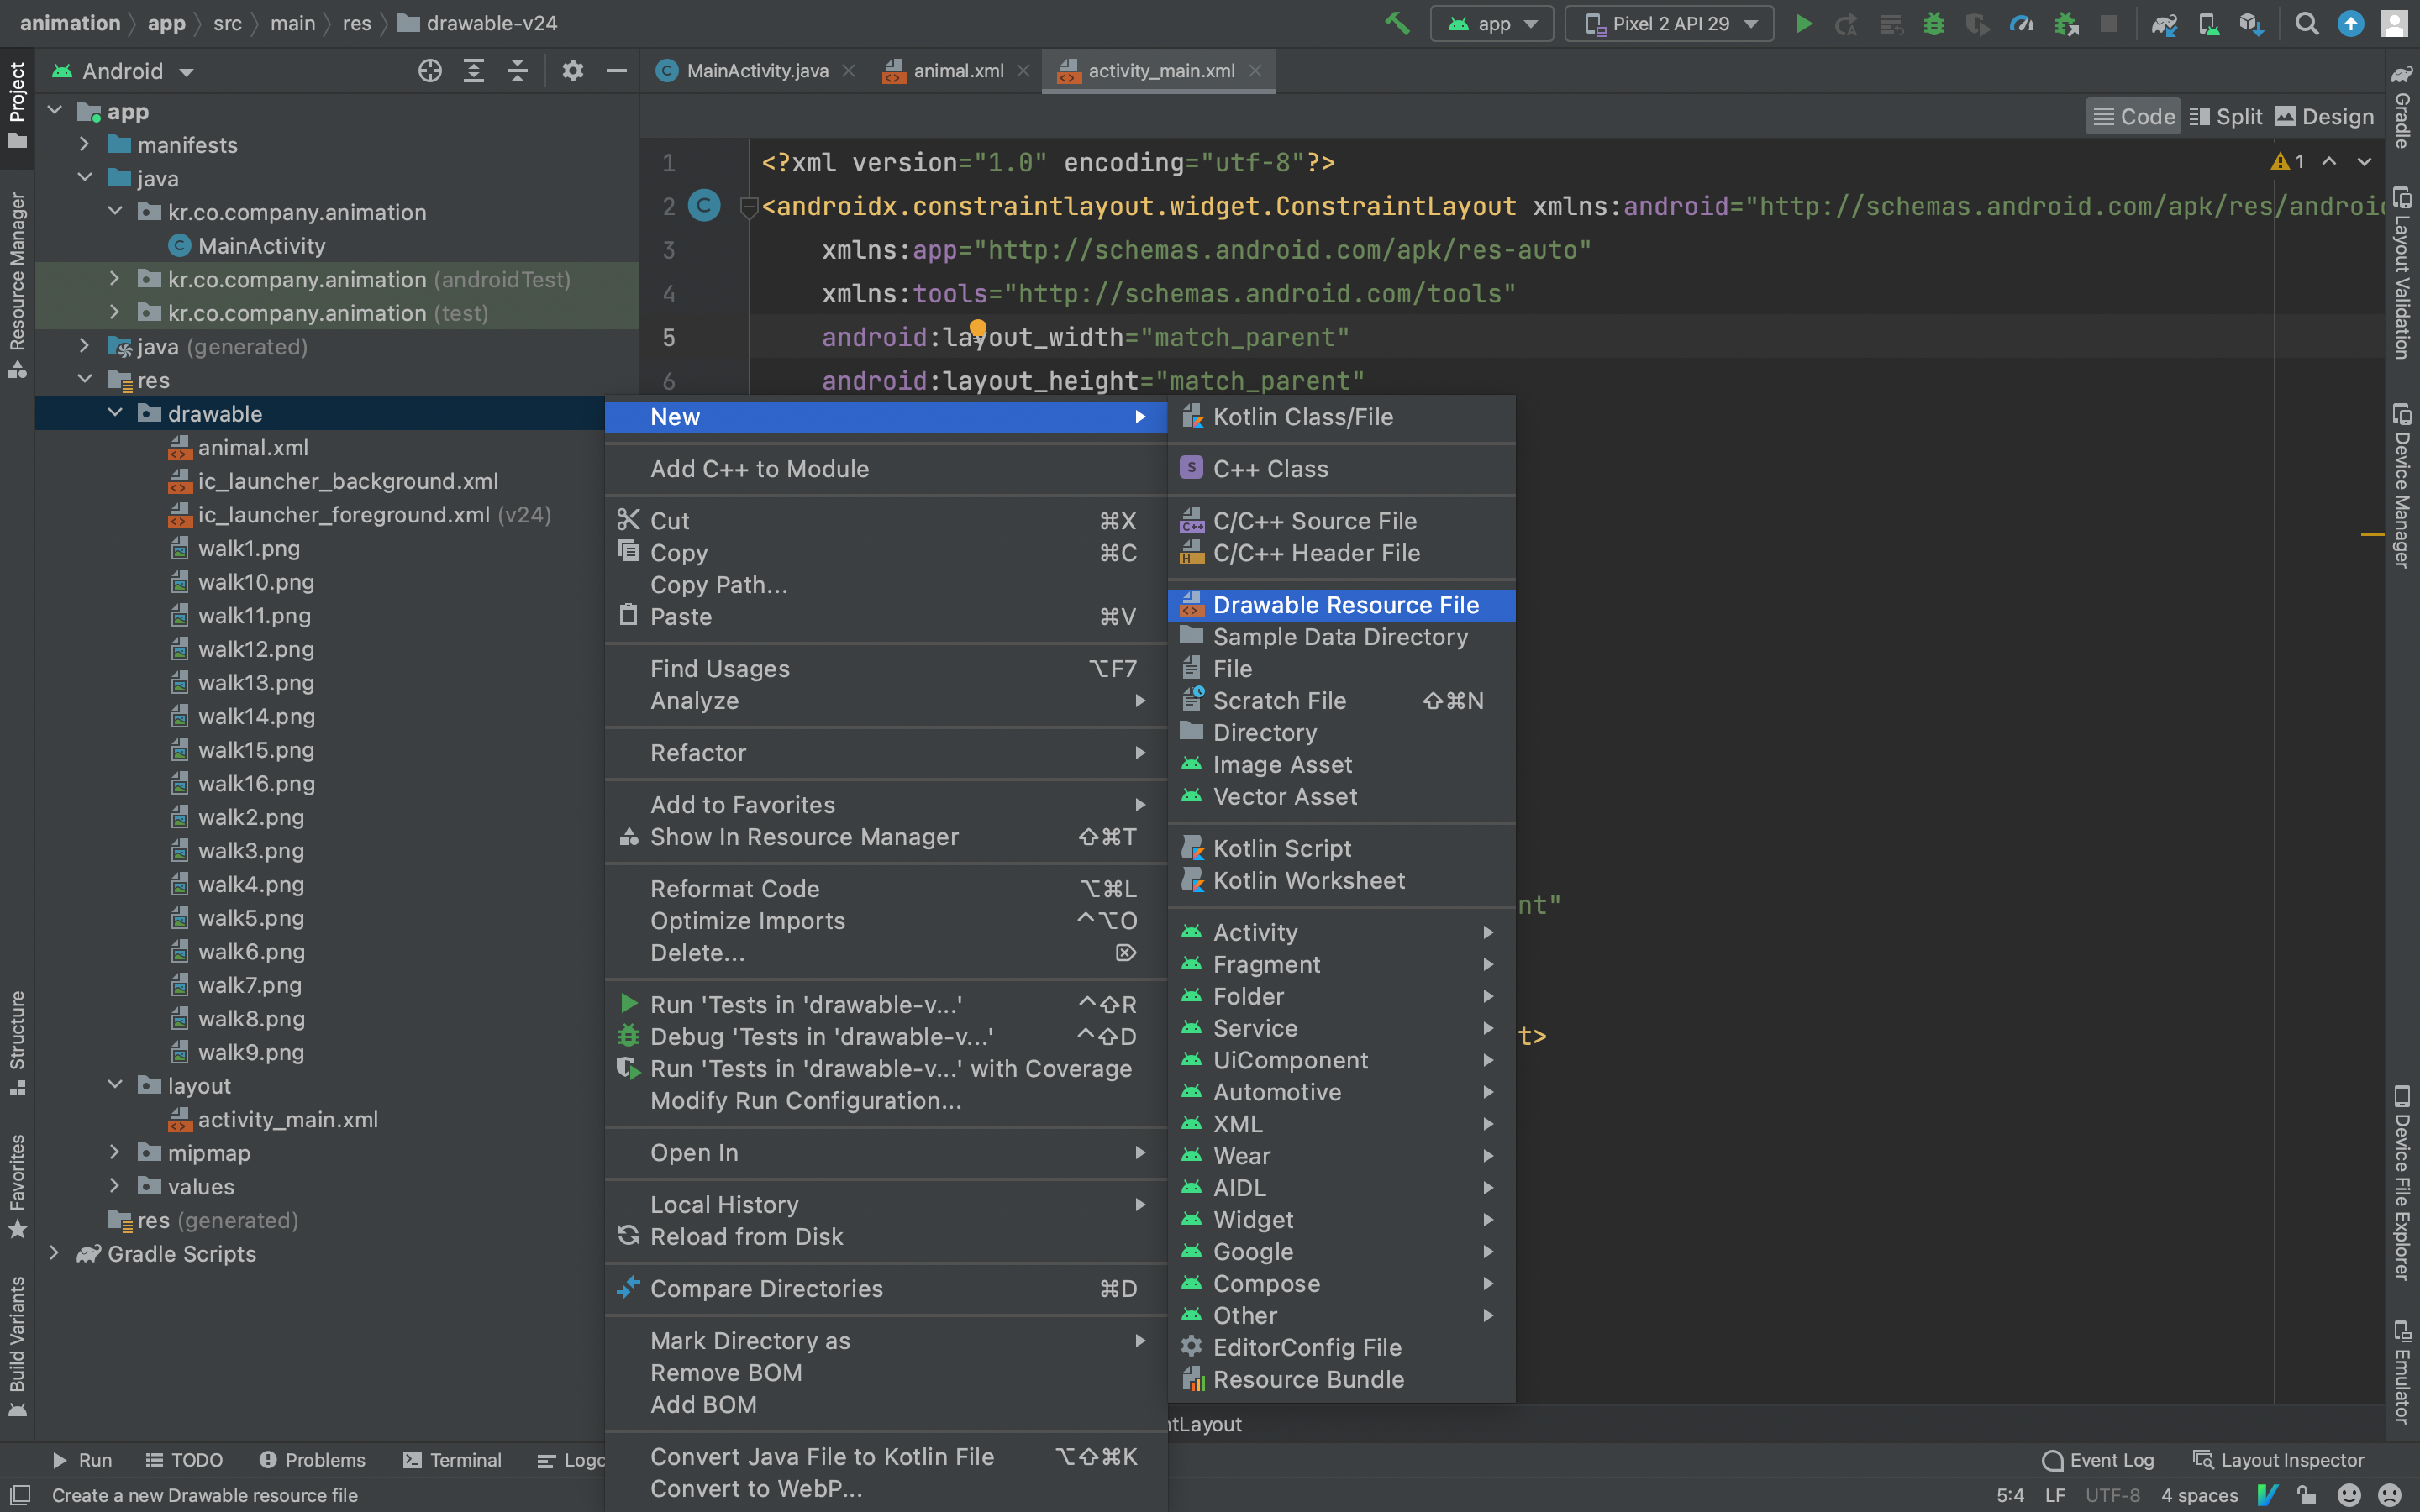
drawable 아래에 Drawable Resource File 생성.
미리 준비해둔 walk1~16.png로 animal.xml에 animation-list를 생성.
animal.xml
<?xml version="1.0" encoding="utf-8"?>
<animation-list xmlns:android="http://schemas.android.com/apk/res/android"
    android:oneshot="false">

    <item
        android:drawable="@drawable/walk1"
        android:duration="100"/>
    <item
        android:drawable="@drawable/walk2"
        android:duration="100"/>
    <item
        android:drawable="@drawable/walk3"
        android:duration="100"/>
    <item
        android:drawable="@drawable/walk4"
        android:duration="100"/>
    <item
        android:drawable="@drawable/walk5"
        android:duration="100"/>
    <item
        android:drawable="@drawable/walk6"
        android:duration="100"/>
    <item
        android:drawable="@drawable/walk7"
        android:duration="100"/>
    <item
        android:drawable="@drawable/walk8"
        android:duration="100"/>
    <item
        android:drawable="@drawable/walk9"
        android:duration="100"/>
    <item
        android:drawable="@drawable/walk10"
        android:duration="100"/>
    <item
        android:drawable="@drawable/walk11"
        android:duration="100"/>
    <item
        android:drawable="@drawable/walk12"
        android:duration="100"/>
    <item
        android:drawable="@drawable/walk13"
        android:duration="100"/>
    <item
        android:drawable="@drawable/walk14"
        android:duration="100"/>
    <item
        android:drawable="@drawable/walk15"
        android:duration="100"/>
    <item
        android:drawable="@drawable/walk16"
        android:duration="100"/>

</animation-list>
android:oneshot="false" : 애니메이션의 반복 여부를 선택한다.
“true” : animation-list의 item들을 1회만 실행.
“false” : animation-list의 item들을 무한히 반복.
출처: https://j2enty.tistory.com/entry/Android-FrameAnimation
<item
        android:drawable="@drawable/walk1"
        android:duration="100"/>
android:duration=”100” : 이미지를 보여줄 시간. ms(1/1000초) 단위로 설정 가능.
activity_main.xml
<?xml version="1.0" encoding="utf-8"?>
<androidx.constraintlayout.widget.ConstraintLayout xmlns:android="http://schemas.android.com/apk/res/android"
    xmlns:app="http://schemas.android.com/apk/res-auto"
    xmlns:tools="http://schemas.android.com/tools"
    android:layout_width="match_parent"
    android:layout_height="match_parent"
    tools:context=".MainActivity">

    <ImageView
        android:id="@+id/walk_image"

        android:background="@drawable/animal"

        android:layout_width="wrap_content"
        android:layout_height="wrap_content"
        android:layout_marginStart="16dp"
        android:layout_marginTop="34dp"
        app:layout_constraintStart_toStartOf="parent"
        app:layout_constraintTop_toTopOf="parent"
        />
</androidx.constraintlayout.widget.ConstraintLayout>
MainActivity.java
package kr.co.company.animation;

import androidx.appcompat.app.AppCompatActivity;

import android.graphics.drawable.AnimationDrawable;
import android.os.Bundle;
import android.view.MotionEvent;
import android.widget.ImageView;

public class MainActivity extends AppCompatActivity {
    AnimationDrawable walkAnimation;

    @Override
    protected void onCreate(Bundle savedInstanceState) {
        super.onCreate(savedInstanceState);
        setContentView(R.layout.activity_main);
        ImageView walkImage = (ImageView) findViewById(R.id.walk_image);
        walkImage.setBackgroundResource(R.drawable.animal);
        walkAnimation = (AnimationDrawable) walkImage.getBackground();
    }

    public boolean onTouchEvent(MotionEvent event){
        if (event.getAction()==MotionEvent.ACTION_DOWN){
            walkAnimation.start();
            return true;
        }
        return super.onTouchEvent(event);
    }
}
AnimationDrawable
An object used to create frame-by-frame animations, defined by a series of Drawable objects, which can be used as a View object's background.
<ImageView
                ...
        android:background="@drawable/animal"
                ...
        />
The simplest way to create a frame-by-frame animation is to define the animation in an XML file, placed in the res/drawable/ folder, and set it as the background to a View object.
walkImage.setBackgroundResource(R.drawable.animal);walkAnimation = (AnimationDrawable) walkImage.getBackground();
출처 : https://developer.android.com/reference/android/view/View
View.getBackground() : Drawable 객체를 반환.
Drawable 객체를 AnimationDrawable로 다운캐스팅 진행.
Then, call start() to run the animation.
public boolean onTouchEvent(MotionEvent event){
        if (event.getAction()==MotionEvent.ACTION_DOWN){
            walkAnimation.start();
            return true;
        }
        return super.onTouchEvent(event);
    }
An AnimationDrawable defined in XML consists of a single <animation-list> element and a series of nested <item> tags. Each item defines a frame of the animation.
<?xml version="1.0" encoding="utf-8"?>
<animation-list xmlns:android="http://schemas.android.com/apk/res/android"
    android:oneshot="false">

    <item
        android:drawable="@drawable/walk1"
        android:duration="100"/>
    <item
        android:drawable="@drawable/walk2"
        android:duration="100"/>
    <item
        android:drawable="@drawable/walk3"
        android:duration="100"/>
                                       ...

</animation-list>
참고 : https://developer.android.com/reference/android/graphics/drawable/AnimationDrawable
코드로 이미지 변경하기

원래 예제는 버튼 2개 이미지 2개다.
직접 진행하면서 버튼 2개에 이미지 5개가 들어가도록 수정했다.
activity_main.xml
<?xml version="1.0" encoding="utf-8"?>
<androidx.constraintlayout.widget.ConstraintLayout xmlns:android="http://schemas.android.com/apk/res/android"
    xmlns:app="http://schemas.android.com/apk/res-auto"
    xmlns:tools="http://schemas.android.com/tools"
    android:layout_width="match_parent"
    android:layout_height="match_parent"
    tools:context=".MainActivity">

    <ImageView
        android:id="@+id/imageView"
        android:src="@drawable/child"
        android:layout_width="wrap_content"
        android:layout_height="wrap_content"
        android:layout_marginTop="219dp"
        app:layout_constraintEnd_toEndOf="parent"
        app:layout_constraintStart_toStartOf="parent"
        app:layout_constraintTop_toTopOf="parent" />

    <Button
        android:id="@+id/left"
        android:text="left"
        android:layout_width="wrap_content"
        android:layout_height="wrap_content"
        android:layout_marginStart="16dp"
        android:layout_marginTop="16dp"
        app:layout_constraintStart_toStartOf="parent"
        app:layout_constraintTop_toTopOf="parent" />

    <Button
        android:id="@+id/right"
        android:text="right"
        android:layout_width="wrap_content"
        android:layout_height="wrap_content"
        android:layout_marginStart="15dp"
        android:layout_marginTop="16dp"
        app:layout_constraintStart_toEndOf="@+id/left"
        app:layout_constraintTop_toTopOf="parent" />
</androidx.constraintlayout.widget.ConstraintLayout>
MainActivity.java
package kr.co.company.imagebutton2;

import androidx.appcompat.app.AppCompatActivity;

import android.os.Bundle;
import android.view.View;
import android.widget.Button;
import android.widget.ImageView;

public class MainActivity extends AppCompatActivity {
    public int state = 0;

    int[] arr={R.drawable.child, R.drawable.modern, R.drawable.top, R.drawable.island, R.drawable.lighthouse};

    @Override
    protected void onCreate(Bundle savedInstanceState) {
        super.onCreate(savedInstanceState);
        setContentView(R.layout.activity_main);

        ImageView imageView = (ImageView) findViewById(R.id.imageView);
        Button button1 = (Button) findViewById(R.id.left);
        Button button2 = (Button) findViewById(R.id.right);

        button1.setOnClickListener(new View.OnClickListener() {
            @Override
            public void onClick(View view) {
                if (state>0) state--;
                imageView.setImageResource(arr[state]);
            }
        });

        button2.setOnClickListener(new View.OnClickListener() {
            @Override
            public void onClick(View view) {
                if(state<4) state++;
                imageView.setImageResource(arr[state]);
            }
        });
    }
}
int[] arr={R.drawable.child, R.drawable.modern, R.drawable.top, R.drawable.island, R.drawable.lighthouse}; : 배열에 5개 그림을 넣는다.
button1.setOnClickListener(new View.OnClickListener() {
            @Override
            public void onClick(View view) {
                if (state>0) state--;
                imageView.setImageResource(arr[state]);
            }
        });
버튼을 누르면 배열의 인덱스를 상승하면서 그림을 변경한다.
단 마지막 5번째 그림에서는 더 이상 변경되지 않는다.
레이아웃
레어아웃의 종류
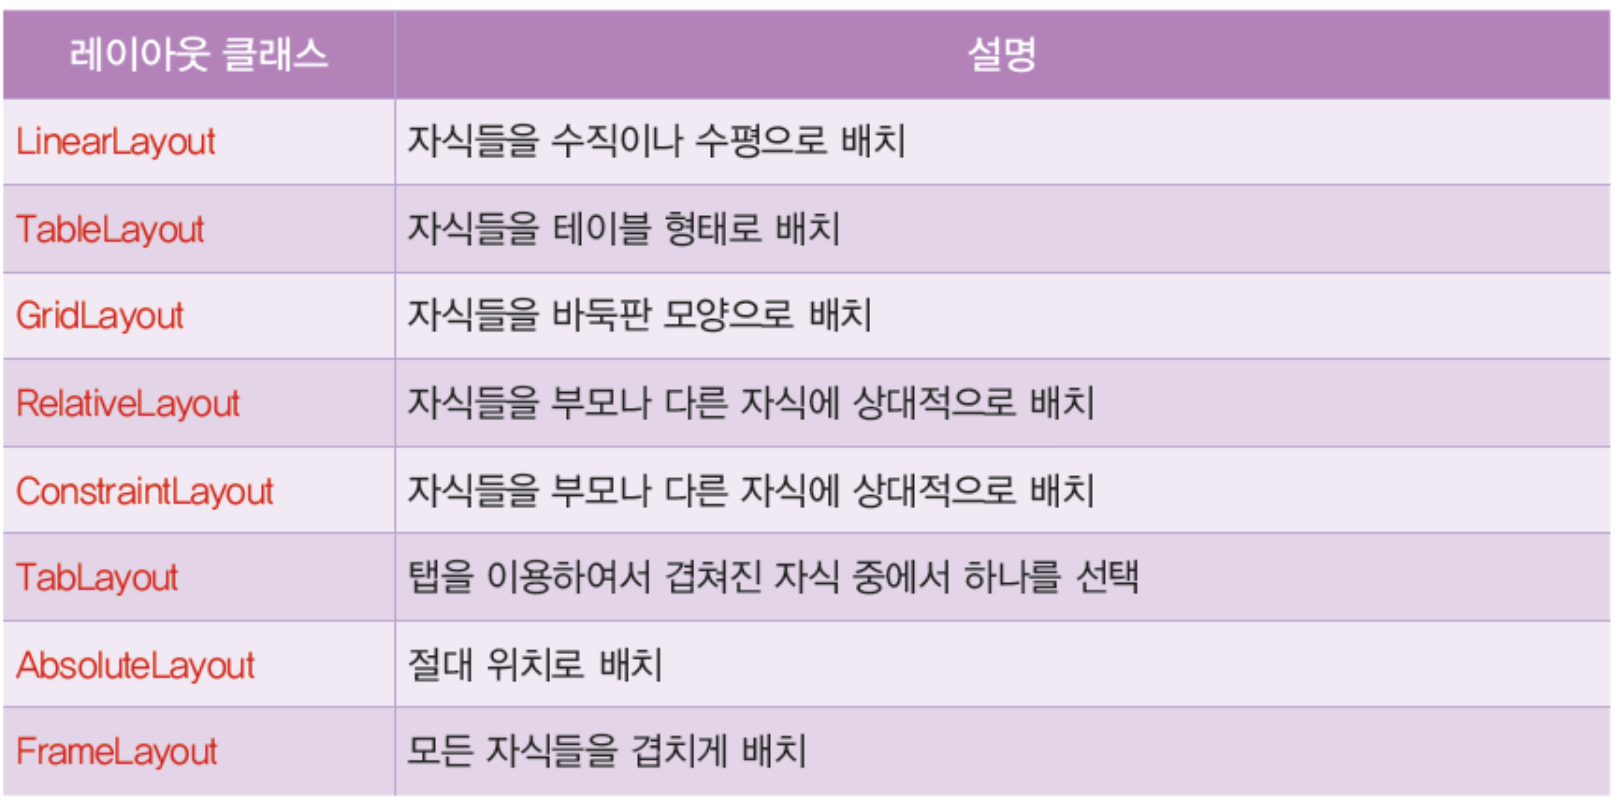
LinearLayout
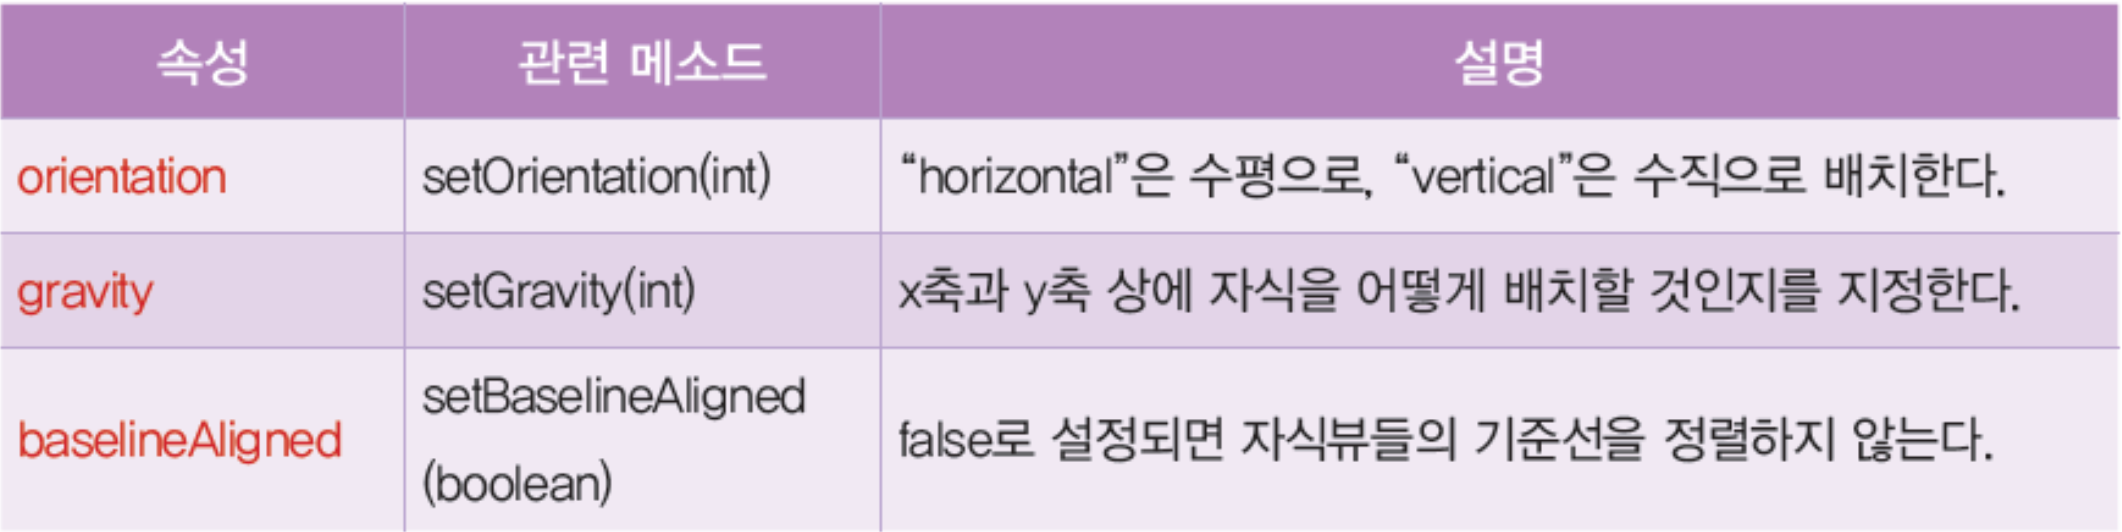
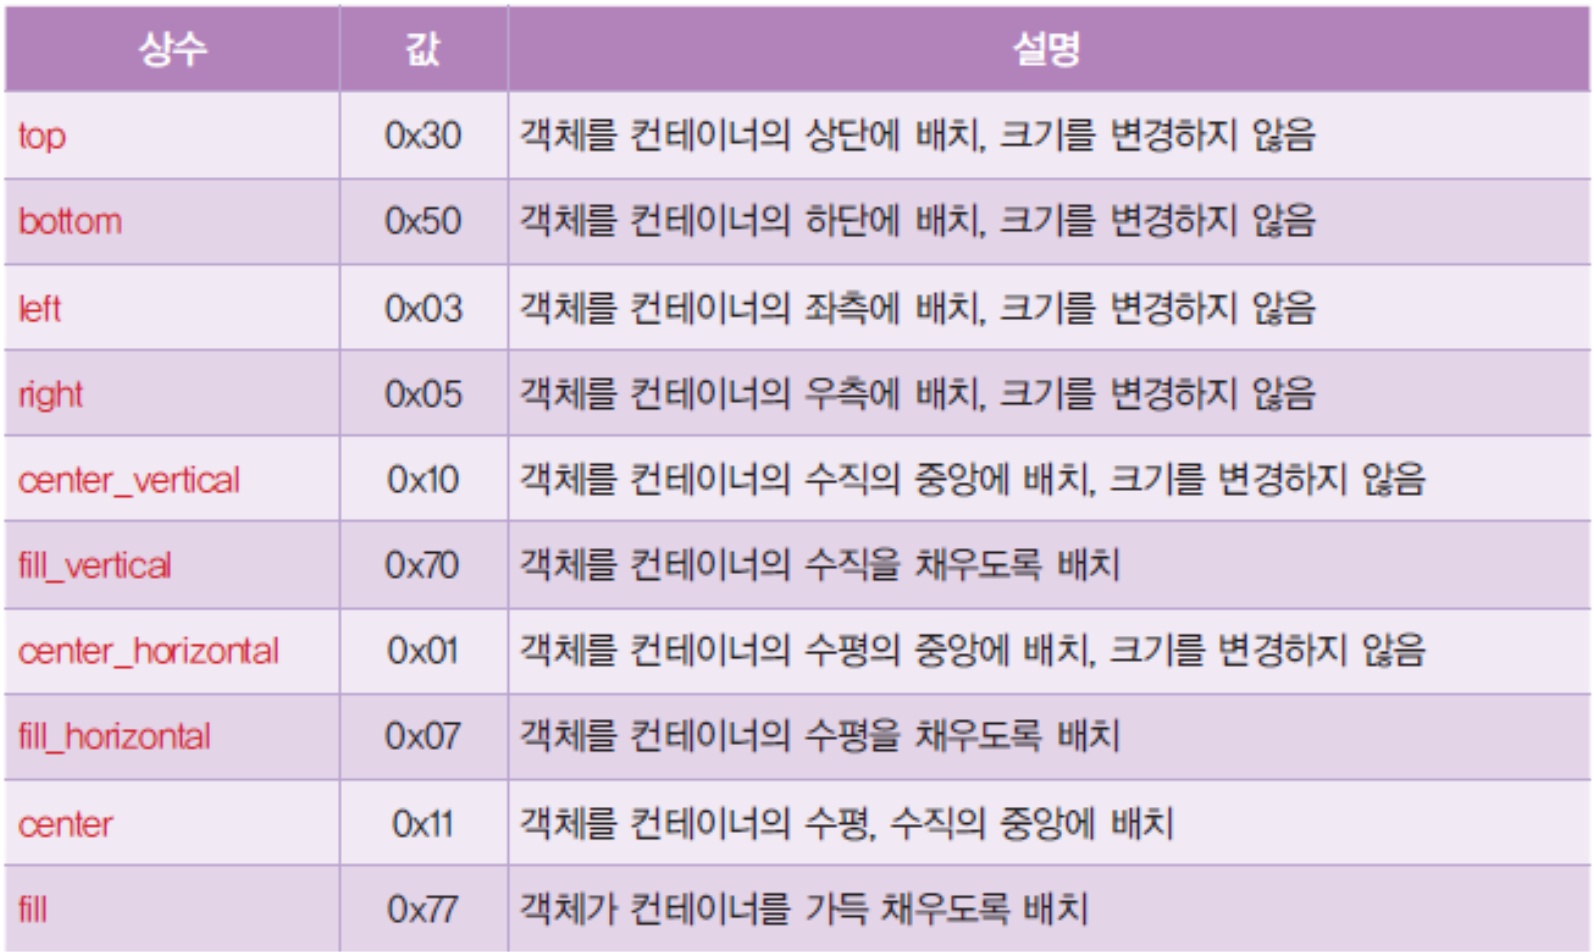
gravity의 속성 값
layout_weight
LinearLayout에선 android:layout_weight =” ” 를 설정할 수 있다.
만약 설정한다면 자식뷰들은 설정한 비중만큼 공간을 할당받는다.
예를 들어서 선형 레이아웃의 자식뷰들의 가중치가 각각 1, 2, 3이면, 남아있는 공간의 1/6, 2/6, 3/6을 각각 할당받는다.
이때 android:layout_height="match_parent"를 사용하면 오류를 발생할 수 있다.
android:layout_height="0dp"로 변경하자.
'학부 강의 > Android_Studio' 카테고리의 다른 글
| 2022-05-15 자바_입출력_스트림 (0) | 2022.05.15 |
|---|---|
| 2022-04-15 Android_Studio_6 (0) | 2022.04.16 |
| 2022-04-01 IdeaVim (0) | 2022.04.01 |
| 2022-03-25 Android_Studio_4 (0) | 2022.03.26 |
| 2022-03-20 Android_Studio_3 (0) | 2022.03.20 |