2022. 3. 26. 15:20ㆍ학부 강의/Android_Studio
2022-03-25
목차
- 이미지소스 추가하는 방법
- 이미지버튼 이벤트 처리
- 버튼 이벤트 처리
- 람다식
- 계산기
이미지소스 추가하는 방법
앱에서 사용할 이미지소스를 안드로이드 스튜디오로 가져오는 방법에 대해 알아보자.
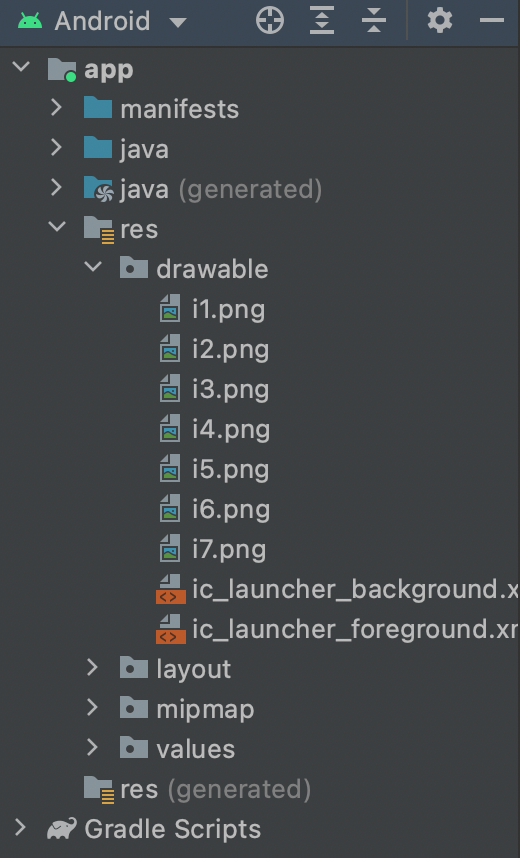
이미지를 사용하기 위해서 res의 drawable 아래로 옮겨야 한다.
이때 이미지들의 이름을 영어로! 영어로! 영어로! 바꿔라. (윈도우 단축키 f2, 맥 단축키 ⏎)
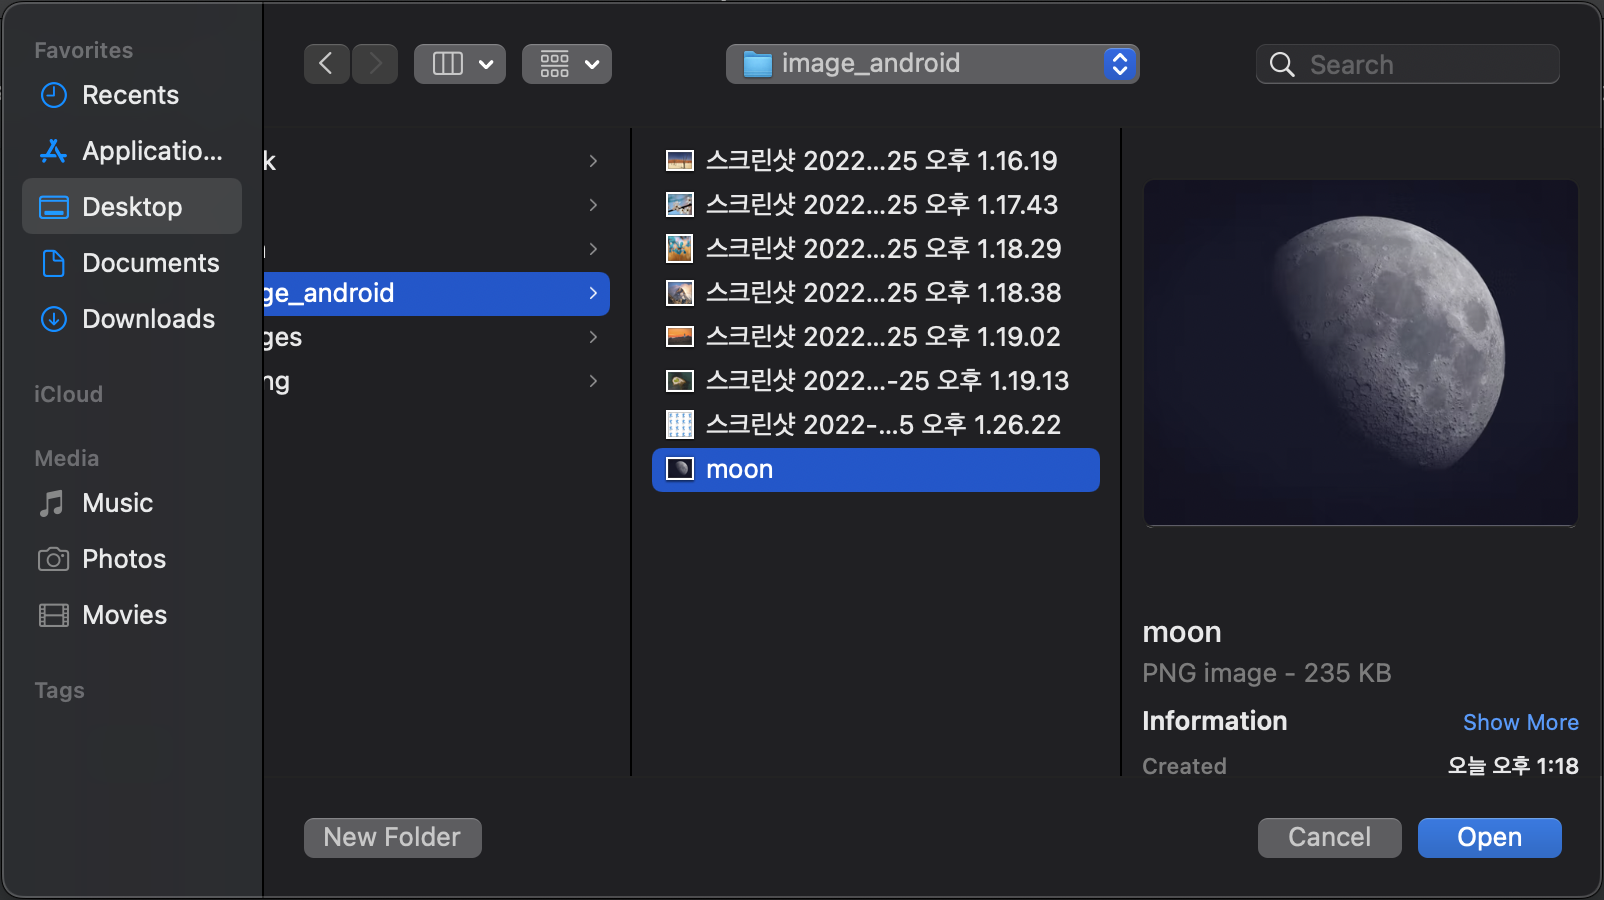
달 사진을 한번 올려보겠다.
폴더에 직접 넣기
.../AndroidStudioProjects/project_name/app/src/main/res/drawable로 옮겨주면 된다.
Resource Manager 이용
안드로이드 스튜디오에서 기본적으로 지원하는 Resource Manager를 이용하는 방법도 있다.

우측에 위치한 버튼을 누른다.
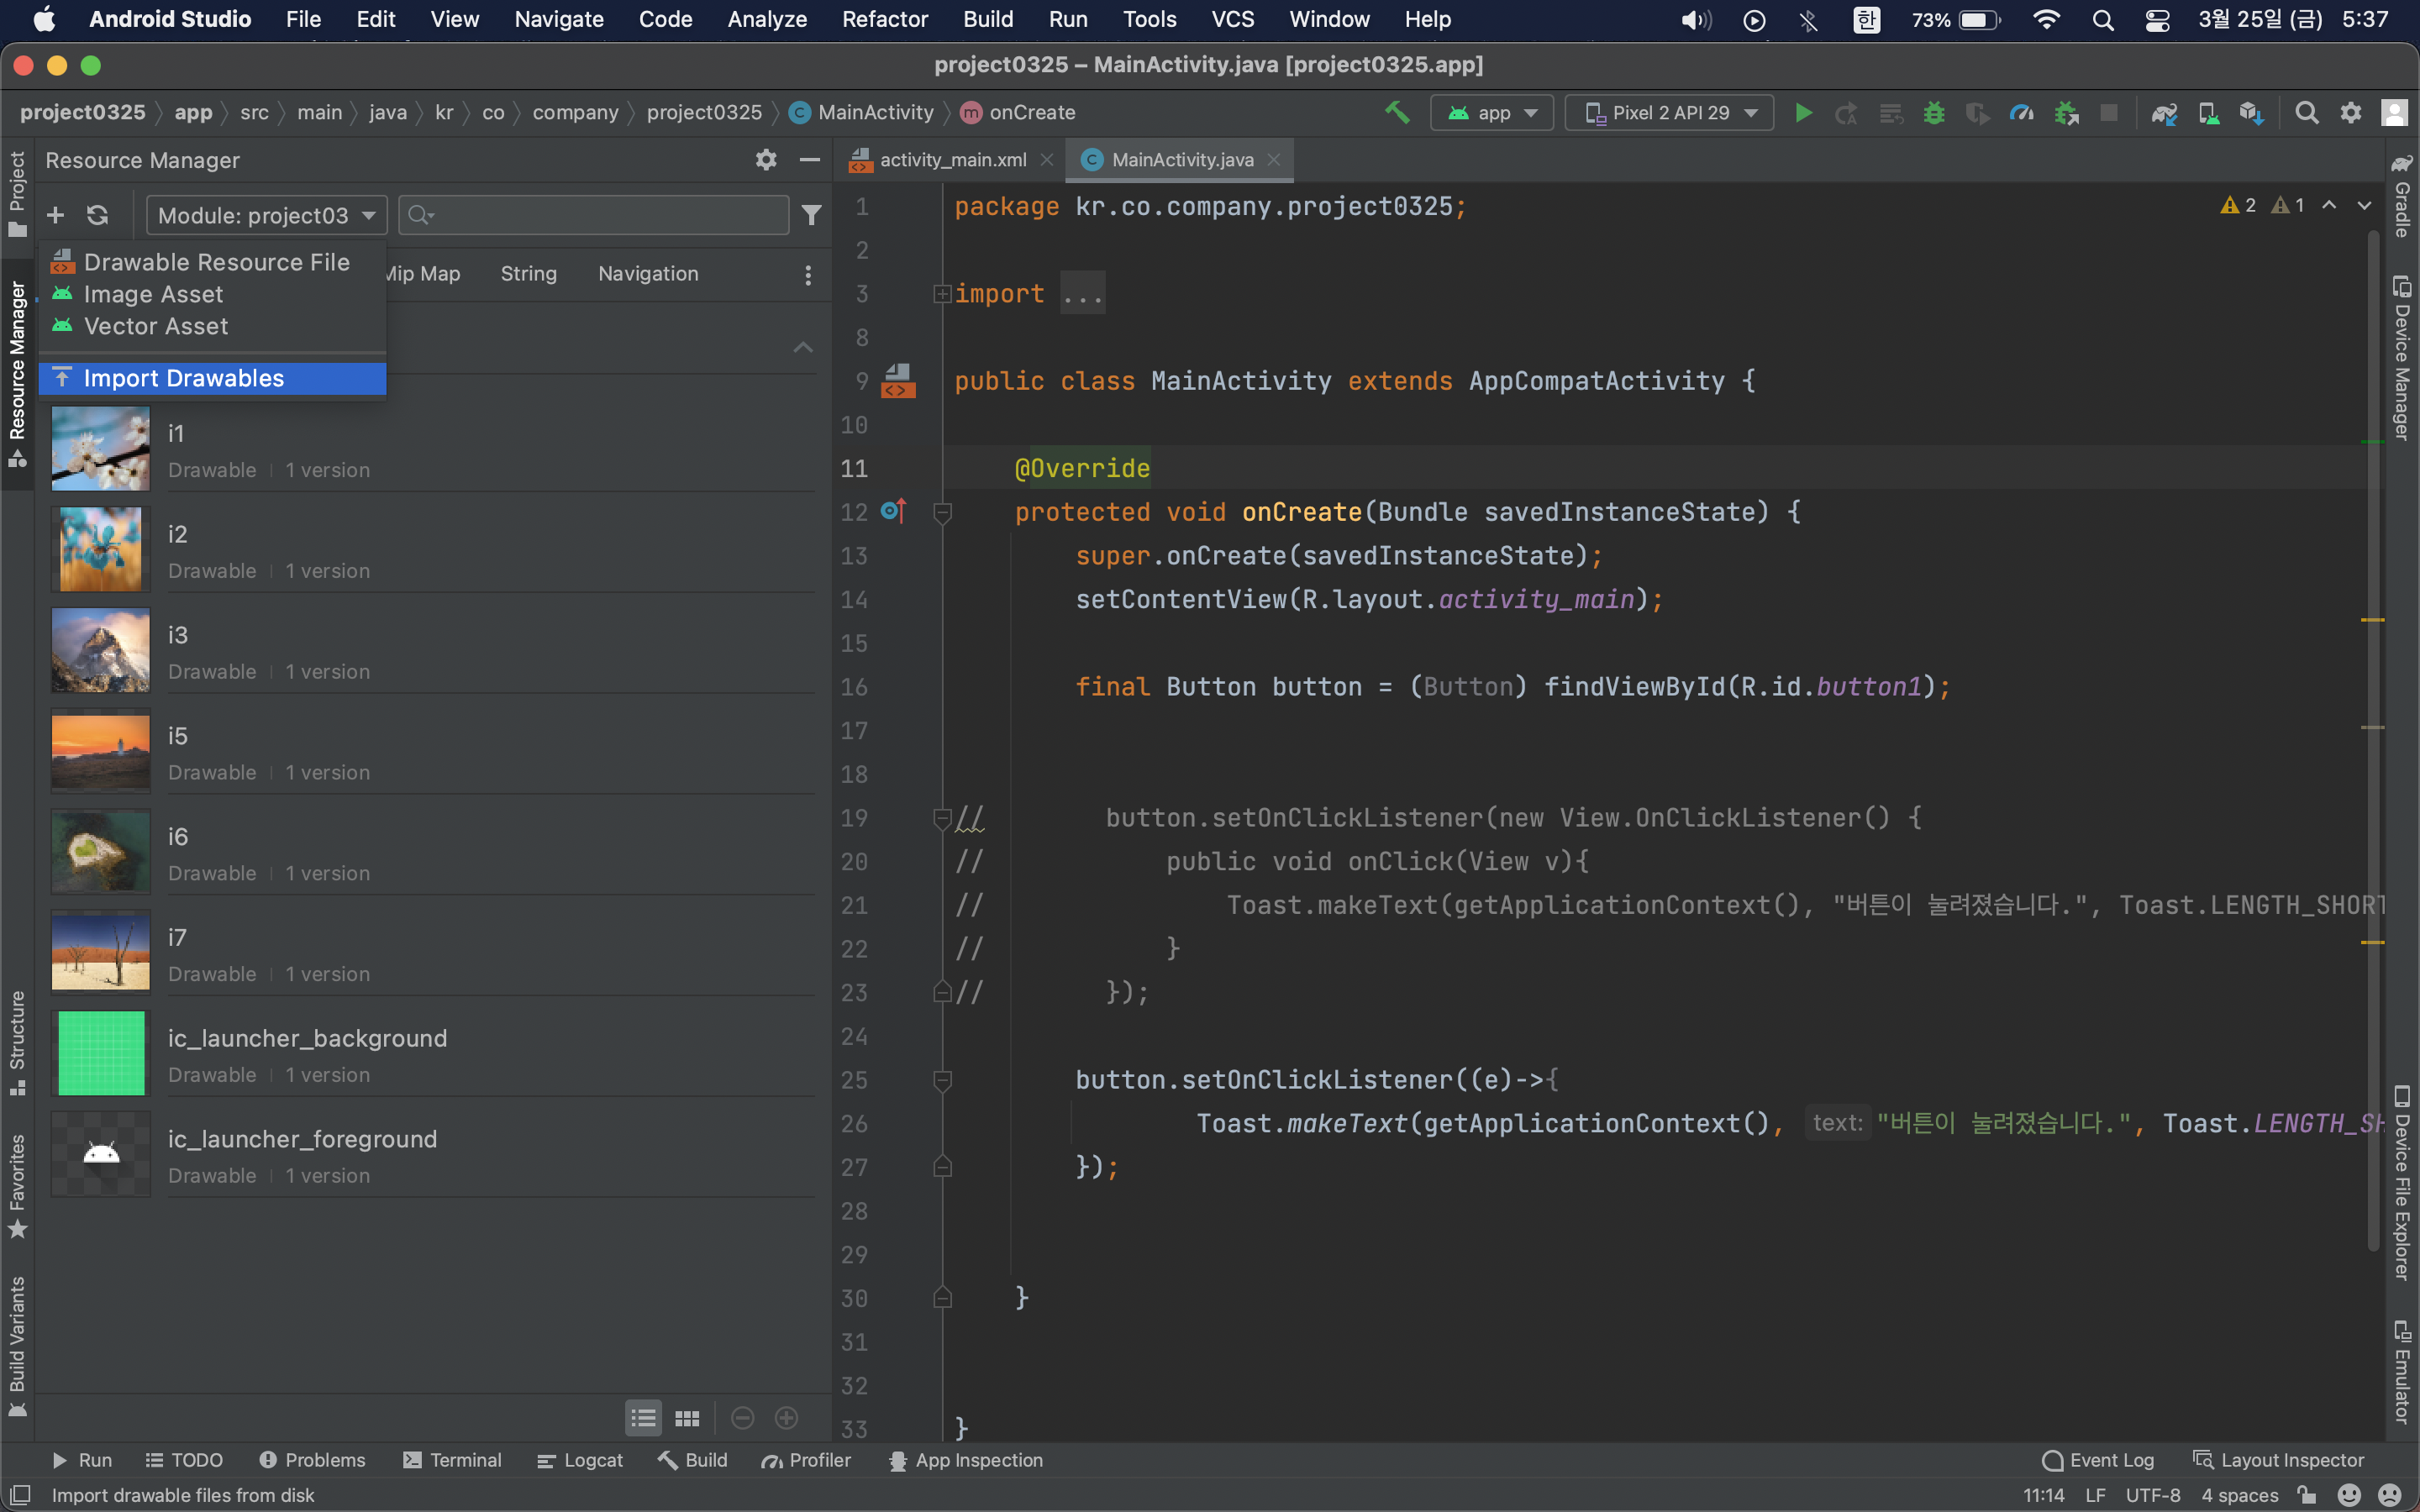
import Drawables → 원하는 이미지 선택 → open → next → import
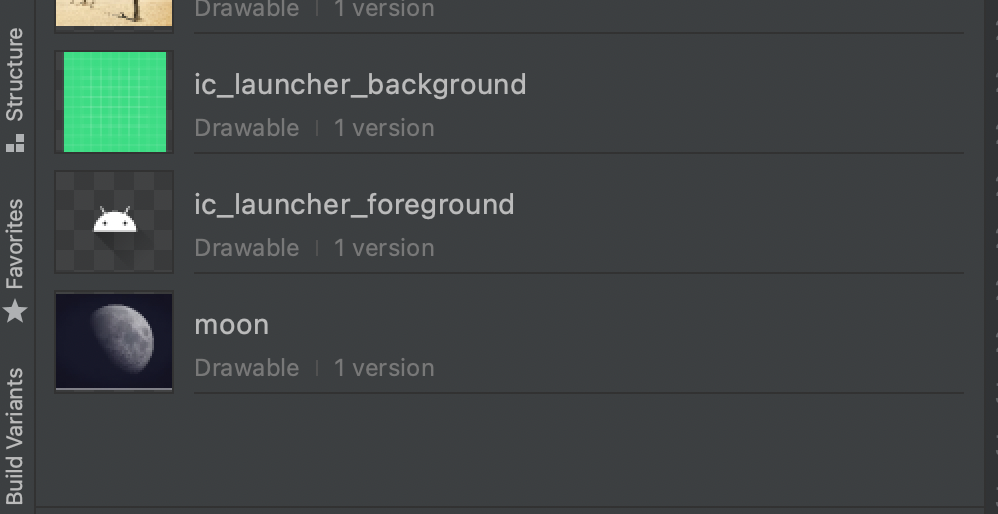
원하는 이미지가 추가된 것을 볼 수 있다.
이미지 버튼 이벤트 처리

이미지를 클릭하면 토스트 메시지를 출력
UI : XML
<ImageButton
        android:id="@+id/imageButton1"
                android:src="@drawable/moon"
        android:onClick="onClick"
/>
android:src="@drawable/moon" 이미지소스 선택
JAVA
public void onClick(View v){
        Toast.makeText(getApplicationContext(),"TO THE MOON", Toast.LENGTH_LONG).show();
    }
onClick 함수 생성
버튼 이벤트 처리
버튼 이벤트를 처리하는 방법으로는 크게 2가지 방법이 있다.
- XML에 onClick으로 지정
- 리스너 설정
리스너는 특정 이벤트가 발생하기를 기다리다가 실행되는 컴포넌트다.
1. XML에 onClick으로 지정

android:onClick="onClick" //XML

public void onClick(View v){ ... } // JAVA
2. 리스너 설정
UI : XML
<Button
        android:id="@+id/button1"
        android:layout_width="wrap_content"
        android:layout_height="wrap_content"
        android:layout_marginStart="16dp"
        android:layout_marginTop="16dp"
        android:text="Push the button."
        app:layout_constraintStart_toStartOf="parent"
        app:layout_constraintTop_toTopOf="parent" />
이전 방식과 달리 android:onClick="onClick"가 없는 것을 알 수 있다.
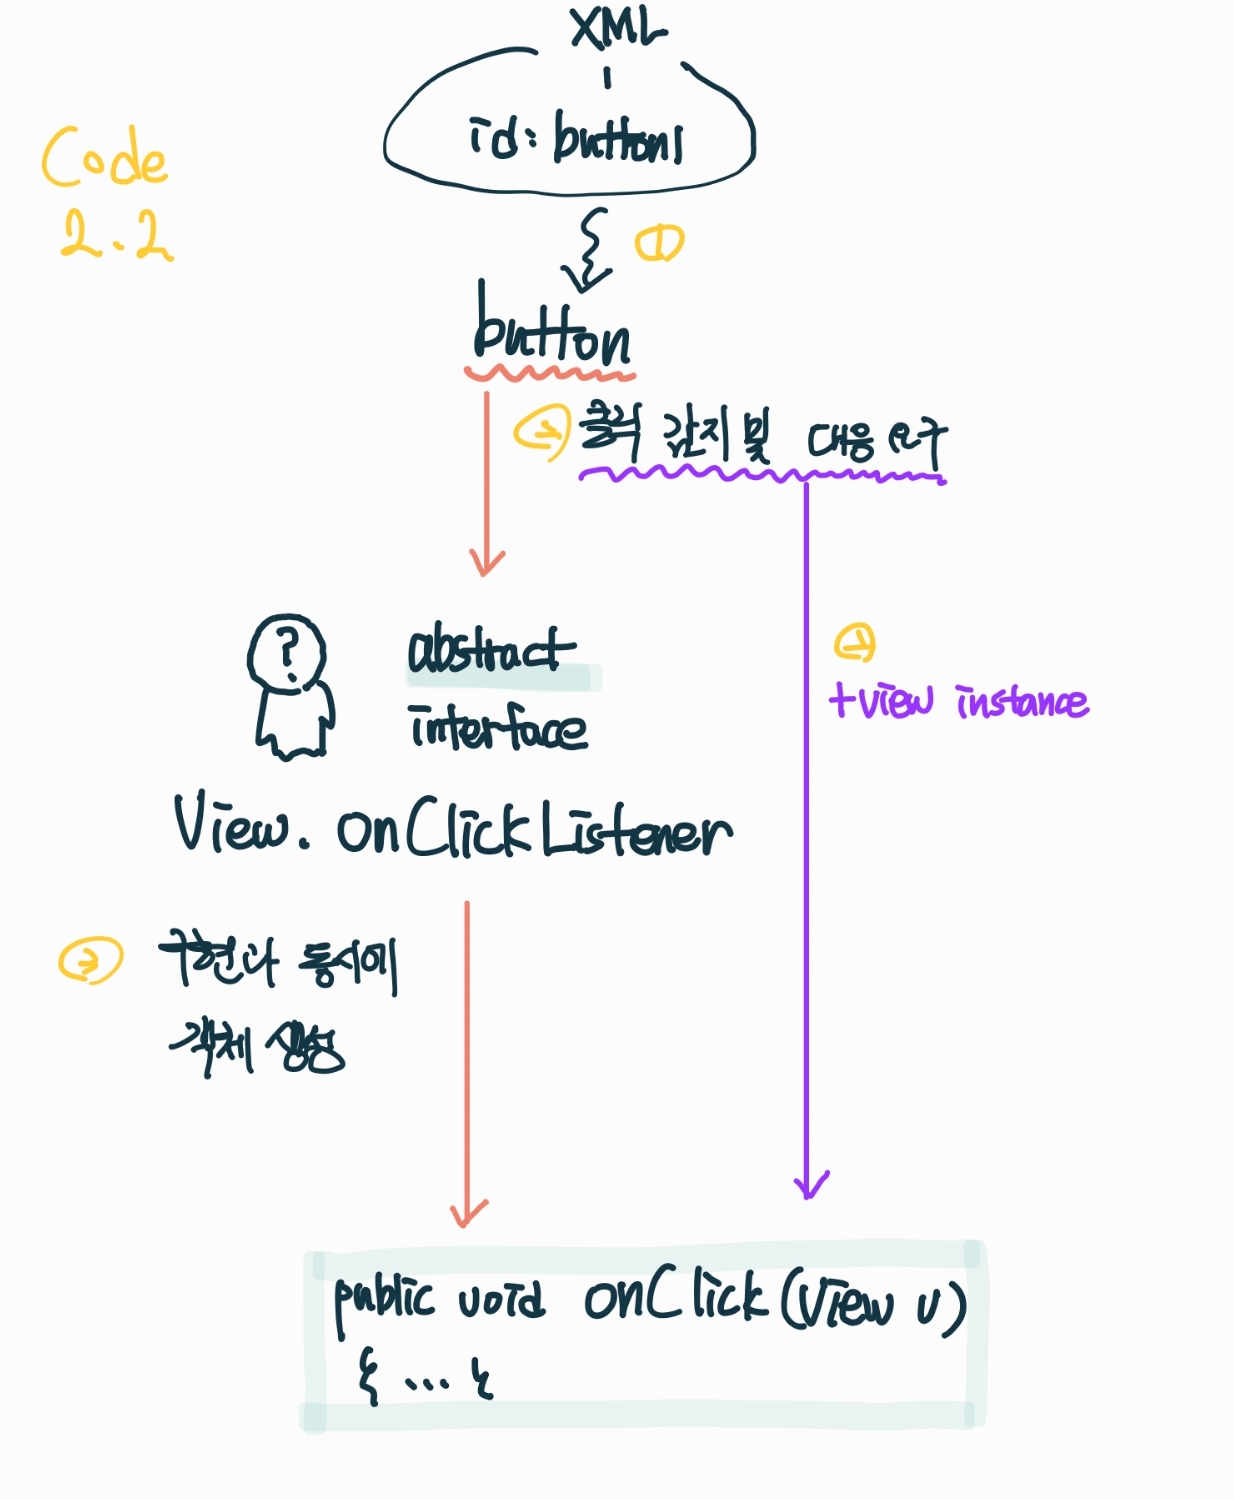
2.1 리스너 객체를 구현하여 버튼 이벤트 처리
public class MainActivity extends AppCompatActivity {

    @Override
    protected void onCreate(Bundle savedInstanceState) {
        super.onCreate(savedInstanceState);
        setContentView(R.layout.activity_main);

        final Button button = (Button) findViewById(R.id.button1); // 1 번

                class Listener implements View.OnClickListener{    // 2번
                    public void onClick(View v){
                Toast.makeText(getApplicationContext(), "버튼이 눌려졌습니다.", Toast.LENGTH_SHORT).show();
            }
                }
                Listener lis = new Listener();    // 3번
        button.setOnClickListener(lis);    // 4번
        }
}
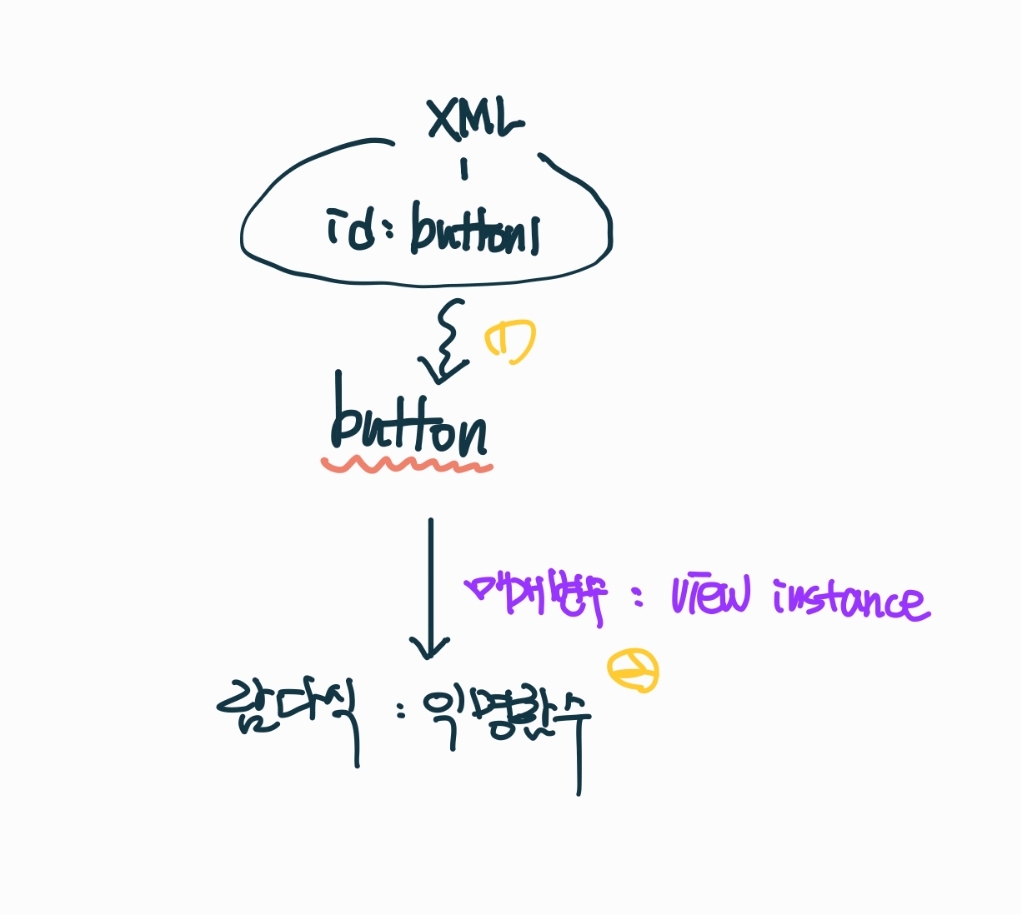
2.2 익명 클래스로 처리하는 방법
JAVA
public class MainActivity extends AppCompatActivity {

    @Override
    protected void onCreate(Bundle savedInstanceState) {
        super.onCreate(savedInstanceState);
        setContentView(R.layout.activity_main);

        final Button button = (Button) findViewById(R.id.button1); // 1번

        button.setOnClickListener(new View.OnClickListener() {
                // 2번 setOnClickListener()
                // 3번 new View.onClickListener(), public void onClick(){...}
            public void onClick(View v){
                Toast.makeText(getApplicationContext(), "버튼이 눌려졌습니다.", Toast.LENGTH_SHORT).show();
            }
        });
        }
}
View
public void onClick(View v){
        Toast.makeText(getApplicationContext(),"TO THE MOON", Toast.LENGTH_LONG).show();
    }
public void onClick(View v)처럼 View를 넣어주는 이유
: onClick 메서드를 구현하는 개발자 입장에서 클릭된 View가 필요할 때가 많기 때문.
이벤트가 발생된 인스턴스의 참조가 필요한 경우가 많아서 발생한 이벤트를 처리하는 콜백에 해당 인스턴스를 넘겨준다.
View v는 매개변수다.
XML의 android:onClick , JAVA의 button.setOnClickListener에서 View 인스턴스를 던짐.
람다식
f(x,y) = x+y

(x,y) -> x+y

(매개변수 리스트) -> {함수 코드}
람다식(Lamda expression)이다.
장점
- 코드가 간결
- 불필요 연산 배제
단점
- 함수의 중복 작성
- 남용 시 가독성 하락
람다식은 익명함수(Anonymous Funtion)의 일종이다.
함수의 이름 없이 매개변수와 함수 코드만 있으면 람다식을 작성할 수 있다.
final Button button = (Button) findViewById(R.id.button1); // 1번

button.setOnClickListener((v)->{
      Toast.makeText(getApplicationContext(), "버튼이 눌려졌습니다.", Toast.LENGTH_SHORT).show();
        });    //  2번

//button.setOnClickListener(new View.OnClickListener() {
//            public void onClick(View v){
//                Toast.makeText(getApplicationContext(), "버튼이 눌려졌습니다.", Toast.LENGTH_SHORT).show();
//            }
//        });
계산기
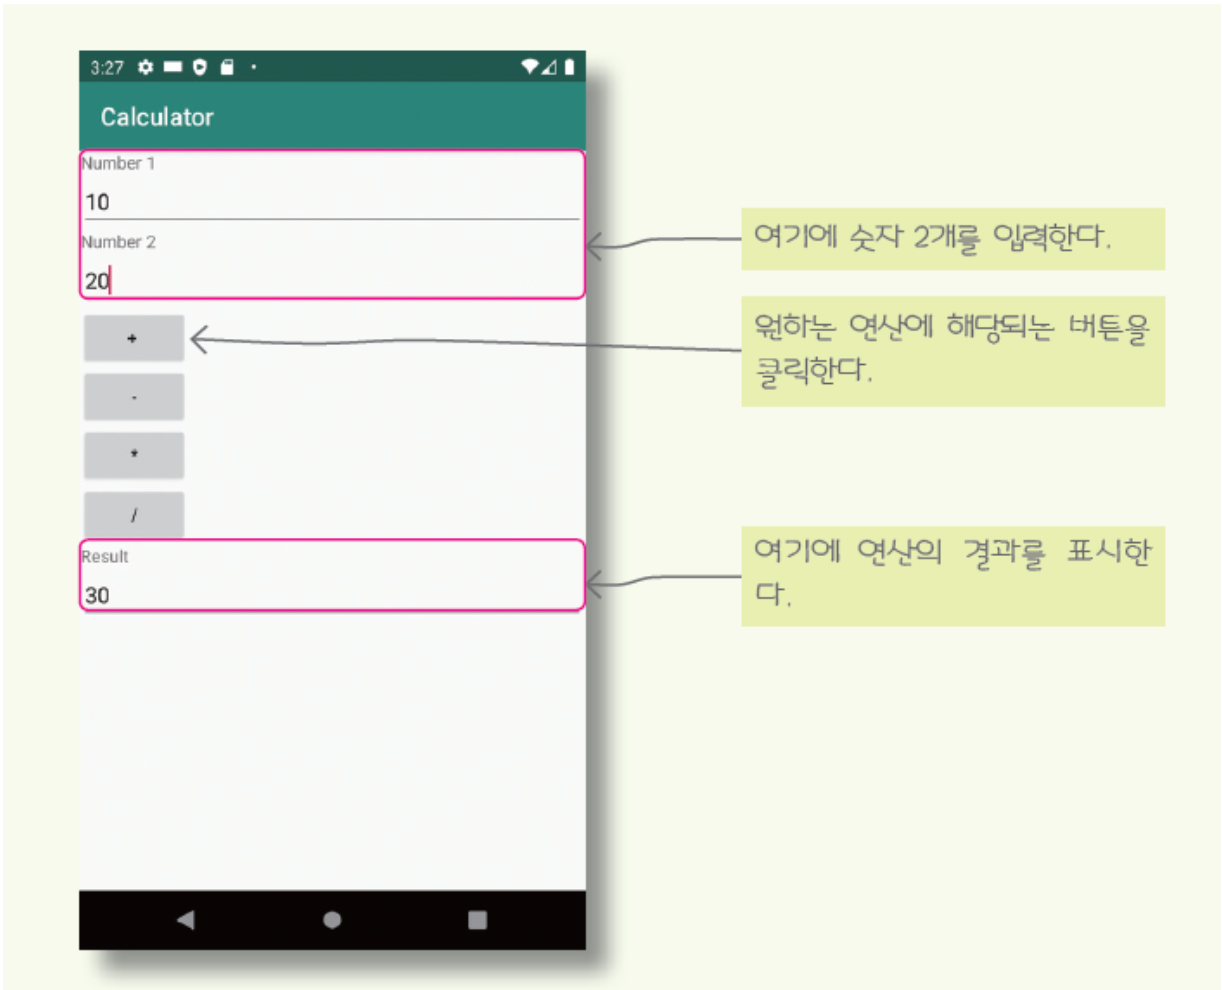
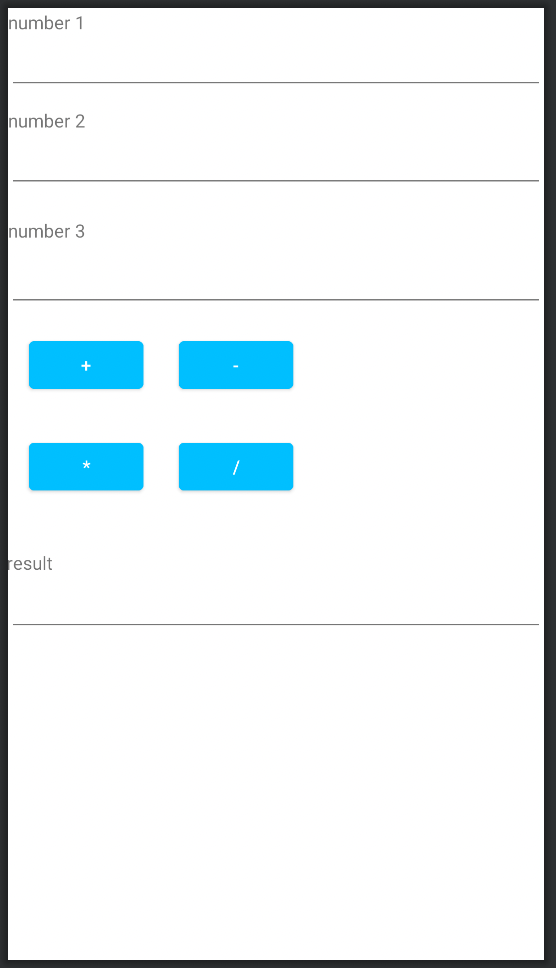
강의 시간에 숫자 입력을 3개로 받는 방향으로 수정했음.
UI 작성 (XML)
<?xml version="1.0" encoding="utf-8"?>
<androidx.constraintlayout.widget.ConstraintLayout xmlns:android="http://schemas.android.com/apk/res/android"
    xmlns:app="http://schemas.android.com/apk/res-auto"
    xmlns:tools="http://schemas.android.com/tools"
    android:layout_width="match_parent"
    android:layout_height="match_parent"
    android:background="@color/white"
    tools:context=".MainActivity">


    <EditText
        android:id="@+id/editText1"
        android:layout_width="0dp"
        android:layout_height="wrap_content"
        android:ems="10"
        android:inputType="text"
        app:layout_constraintEnd_toEndOf="parent"
        app:layout_constraintStart_toStartOf="parent"
        app:layout_constraintTop_toBottomOf="@+id/textView1" />

    <EditText
        android:id="@+id/editText2"
        android:layout_width="0dp"
        android:layout_height="wrap_content"
        android:ems="10"
        android:inputType="text"
        app:layout_constraintEnd_toEndOf="parent"
        app:layout_constraintStart_toStartOf="parent"
        app:layout_constraintTop_toBottomOf="@+id/textView2" />

    <EditText
        android:id="@+id/editText3"
        android:layout_width="0dp"
        android:layout_height="wrap_content"
        android:layout_marginTop="7dp"
        android:ems="10"
        android:inputType="text"
        app:layout_constraintEnd_toEndOf="parent"
        app:layout_constraintStart_toStartOf="parent"
        app:layout_constraintTop_toBottomOf="@+id/textView4" />

    <EditText
        android:id="@+id/editText4"
        android:layout_width="0dp"
        android:layout_height="wrap_content"
        android:layout_marginTop="1dp"
        android:ems="10"
        android:inputType="text"
        app:layout_constraintEnd_toEndOf="parent"
        app:layout_constraintStart_toStartOf="parent"
        app:layout_constraintTop_toBottomOf="@+id/textView3" />

    <TextView
        android:id="@+id/textView3"
        android:layout_width="wrap_content"
        android:layout_height="wrap_content"
        android:layout_marginTop="40dp"
        android:text="result"
        app:layout_constraintEnd_toStartOf="@+id/button3"
        app:layout_constraintStart_toStartOf="@+id/button3"
        app:layout_constraintTop_toBottomOf="@+id/button3" />


    <TextView
        android:id="@+id/textView1"
        android:layout_width="wrap_content"
        android:layout_height="wrap_content"
        android:layout_marginTop="1dp"
        android:text="number 1"
        app:layout_constraintStart_toStartOf="@+id/editText1"
        app:layout_constraintTop_toTopOf="parent" />

    <TextView
        android:id="@+id/textView2"
        android:layout_width="wrap_content"
        android:layout_height="wrap_content"
        android:layout_marginTop="11dp"
        android:text="number 2"
        app:layout_constraintStart_toStartOf="@+id/editText2"
        app:layout_constraintTop_toBottomOf="@+id/editText1" />

    <TextView
        android:id="@+id/textView4"
        android:layout_width="wrap_content"
        android:layout_height="wrap_content"
        android:layout_marginTop="20dp"
        android:text="number 3"
        app:layout_constraintStart_toStartOf="parent"
        app:layout_constraintTop_toBottomOf="@+id/editText2" />

    <Button
        android:id="@+id/button1"
        android:layout_width="wrap_content"
        android:layout_height="wrap_content"
        android:layout_marginStart="16dp"
        android:backgroundTint="#00BFFF"
        android:text="+"
        app:layout_constraintBaseline_toBaselineOf="@+id/button2"
        app:layout_constraintStart_toStartOf="parent" />

    <Button
        android:id="@+id/button3"
        android:layout_width="wrap_content"
        android:layout_height="wrap_content"
        android:layout_marginStart="16dp"
        android:backgroundTint="#00BFFF"
        android:text="*"
        app:layout_constraintBaseline_toBaselineOf="@+id/button4"
        app:layout_constraintStart_toStartOf="parent" />

    <Button
        android:id="@+id/button4"
        android:layout_width="wrap_content"
        android:layout_height="wrap_content"
        android:layout_marginTop="30dp"
        android:backgroundTint="#00BFFF"
        android:text="/"
        app:layout_constraintStart_toStartOf="@+id/button2"
        app:layout_constraintTop_toBottomOf="@+id/button2" />

    <Button
        android:id="@+id/button2"
        android:layout_width="wrap_content"
        android:layout_height="wrap_content"
        android:layout_marginStart="27dp"
        android:layout_marginTop="18dp"
        android:backgroundTint="#00BFFF"
        android:text="-"
        app:layout_constraintStart_toEndOf="@+id/button1"
        app:layout_constraintTop_toBottomOf="@+id/editText3" />

</androidx.constraintlayout.widget.ConstraintLayout>
자바 코드 작성 (JAVA)
package kr.co.company.hello;

import android.os.Bundle;
import android.widget.Button;
import android.widget.EditText;
import android.widget.Toast;

import androidx.appcompat.app.AppCompatActivity;

public class MainActivity extends AppCompatActivity {

    @Override
    protected void onCreate(Bundle savedInstanceState) {
        super.onCreate(savedInstanceState);
        setContentView(R.layout.activity_main);

        EditText eText1 = (EditText) findViewById(R.id.editText1);
        EditText eText2 = (EditText) findViewById(R.id.editText2);
        EditText eText3 = (EditText) findViewById(R.id.editText3);
        EditText eText4 = (EditText) findViewById(R.id.editText4);

        Button bPlus =(Button) findViewById(R.id.button1);
        bPlus.setOnClickListener(e -> {
            String s1 = eText1.getText().toString();
            String s2 = eText2.getText().toString();
            String s3 = eText3.getText().toString();
            int result = Integer.parseInt(s1) + Integer.parseInt(s2)+ Integer.parseInt(s3);
            eText4.setText(""+result);
            Toast.makeText(getApplicationContext(), "버튼이 눌렸습니다.", Toast.LENGTH_LONG).show();
        });

        Button bMinus =(Button) findViewById(R.id.button2);
        bMinus.setOnClickListener(e -> {
            String s1 = eText1.getText().toString();
            String s2 = eText2.getText().toString();
            String s3 = eText3.getText().toString();
            int result = Integer.parseInt(s1) - Integer.parseInt(s2) - Integer.parseInt(s3);
            eText4.setText(""+result);
            Toast.makeText(getApplicationContext(), "버튼이 눌렸습니다.", Toast.LENGTH_LONG).show();
        });

        Button bMul =(Button) findViewById(R.id.button3);
        bMul.setOnClickListener(e -> {
            String s1 = eText1.getText().toString();
            String s2 = eText2.getText().toString();
            String s3 = eText3.getText().toString();
            int result = Integer.parseInt(s1) * Integer.parseInt(s2) * Integer.parseInt(s3);
            eText4.setText(""+result);
            Toast.makeText(getApplicationContext(), "버튼이 눌렸습니다.", Toast.LENGTH_LONG).show();
        });

        Button bDiv =(Button) findViewById(R.id.button4);
        bDiv.setOnClickListener(e -> {
            String s1 = eText1.getText().toString();
            String s2 = eText2.getText().toString();
            String s3 = eText3.getText().toString();
            int result = Integer.parseInt(s1) / Integer.parseInt(s2) / Integer.parseInt(s3);
            eText4.setText(""+result);
            Toast.makeText(getApplicationContext(), "버튼이 눌렸습니다.", Toast.LENGTH_LONG).show();
        });

    }

}
MainActivity.java 코드를 살펴보면
EditText eText1 = (EditText) findViewById(R.id.editText1);
EditText eText2 = (EditText) findViewById(R.id.editText2);
EditText eText3 = (EditText) findViewById(R.id.editText3);
EditText eText4 = (EditText) findViewById(R.id.editText4);
activity_main.xml과 MainActivity를 연결한다.
이때 각 위젯의 id를 사용한다.
 Button bPlus =(Button) findViewById(R.id.button1);
        bPlus.setOnClickListener(e -> {
            String s1 = eText1.getText().toString();
            String s2 = eText2.getText().toString();
            String s3 = eText3.getText().toString();
            int result = Integer.parseInt(s1) + Integer.parseInt(s2)+ Integer.parseInt(s3);
            eText4.setText(""+result);
            Toast.makeText(getApplicationContext(), "버튼이 눌렸습니다.", Toast.LENGTH_LONG).show();
        });
람다식을 볼 수 있다.
람다식을 이용해서 리스너 버튼의 이벤트를 처리한다.
etext들 즉 editText들의 text를 .toString()으로 문자열로 바꿔 s1, s2, s3에 넣는다.
s1, s2, s3를 int로 파싱해서 더하기 빼기 곱하기 나누기를 한다.
여기선 더하기 연산을 진행한 후 result를 걸쳐 eText4에 setText되는 것을 볼 수 있다.
토스트 메시지도 출력되고 있다.
'학부 강의 > Android_Studio' 카테고리의 다른 글
| 2022-04-03 Android_Studio_5 (0) | 2022.04.04 |
|---|---|
| 2022-04-01 IdeaVim (0) | 2022.04.01 |
| 2022-03-20 Android_Studio_3 (0) | 2022.03.20 |
| 2022-03-13 Android_Studio_2 (0) | 2022.03.13 |
| 2022-03-11 Android_studio_1 (0) | 2022.03.13 |